 |
Matronics Email Lists
Web Forum Interface to the Matronics Email Lists
|
| View previous topic :: View next topic |
| Author |
Message |
wdaniell.longport(at)gmai
Guest
|
 Posted: Thu Feb 02, 2017 3:46 am Post subject: Painting Posted: Thu Feb 02, 2017 3:46 am Post subject: Painting |
 |
|
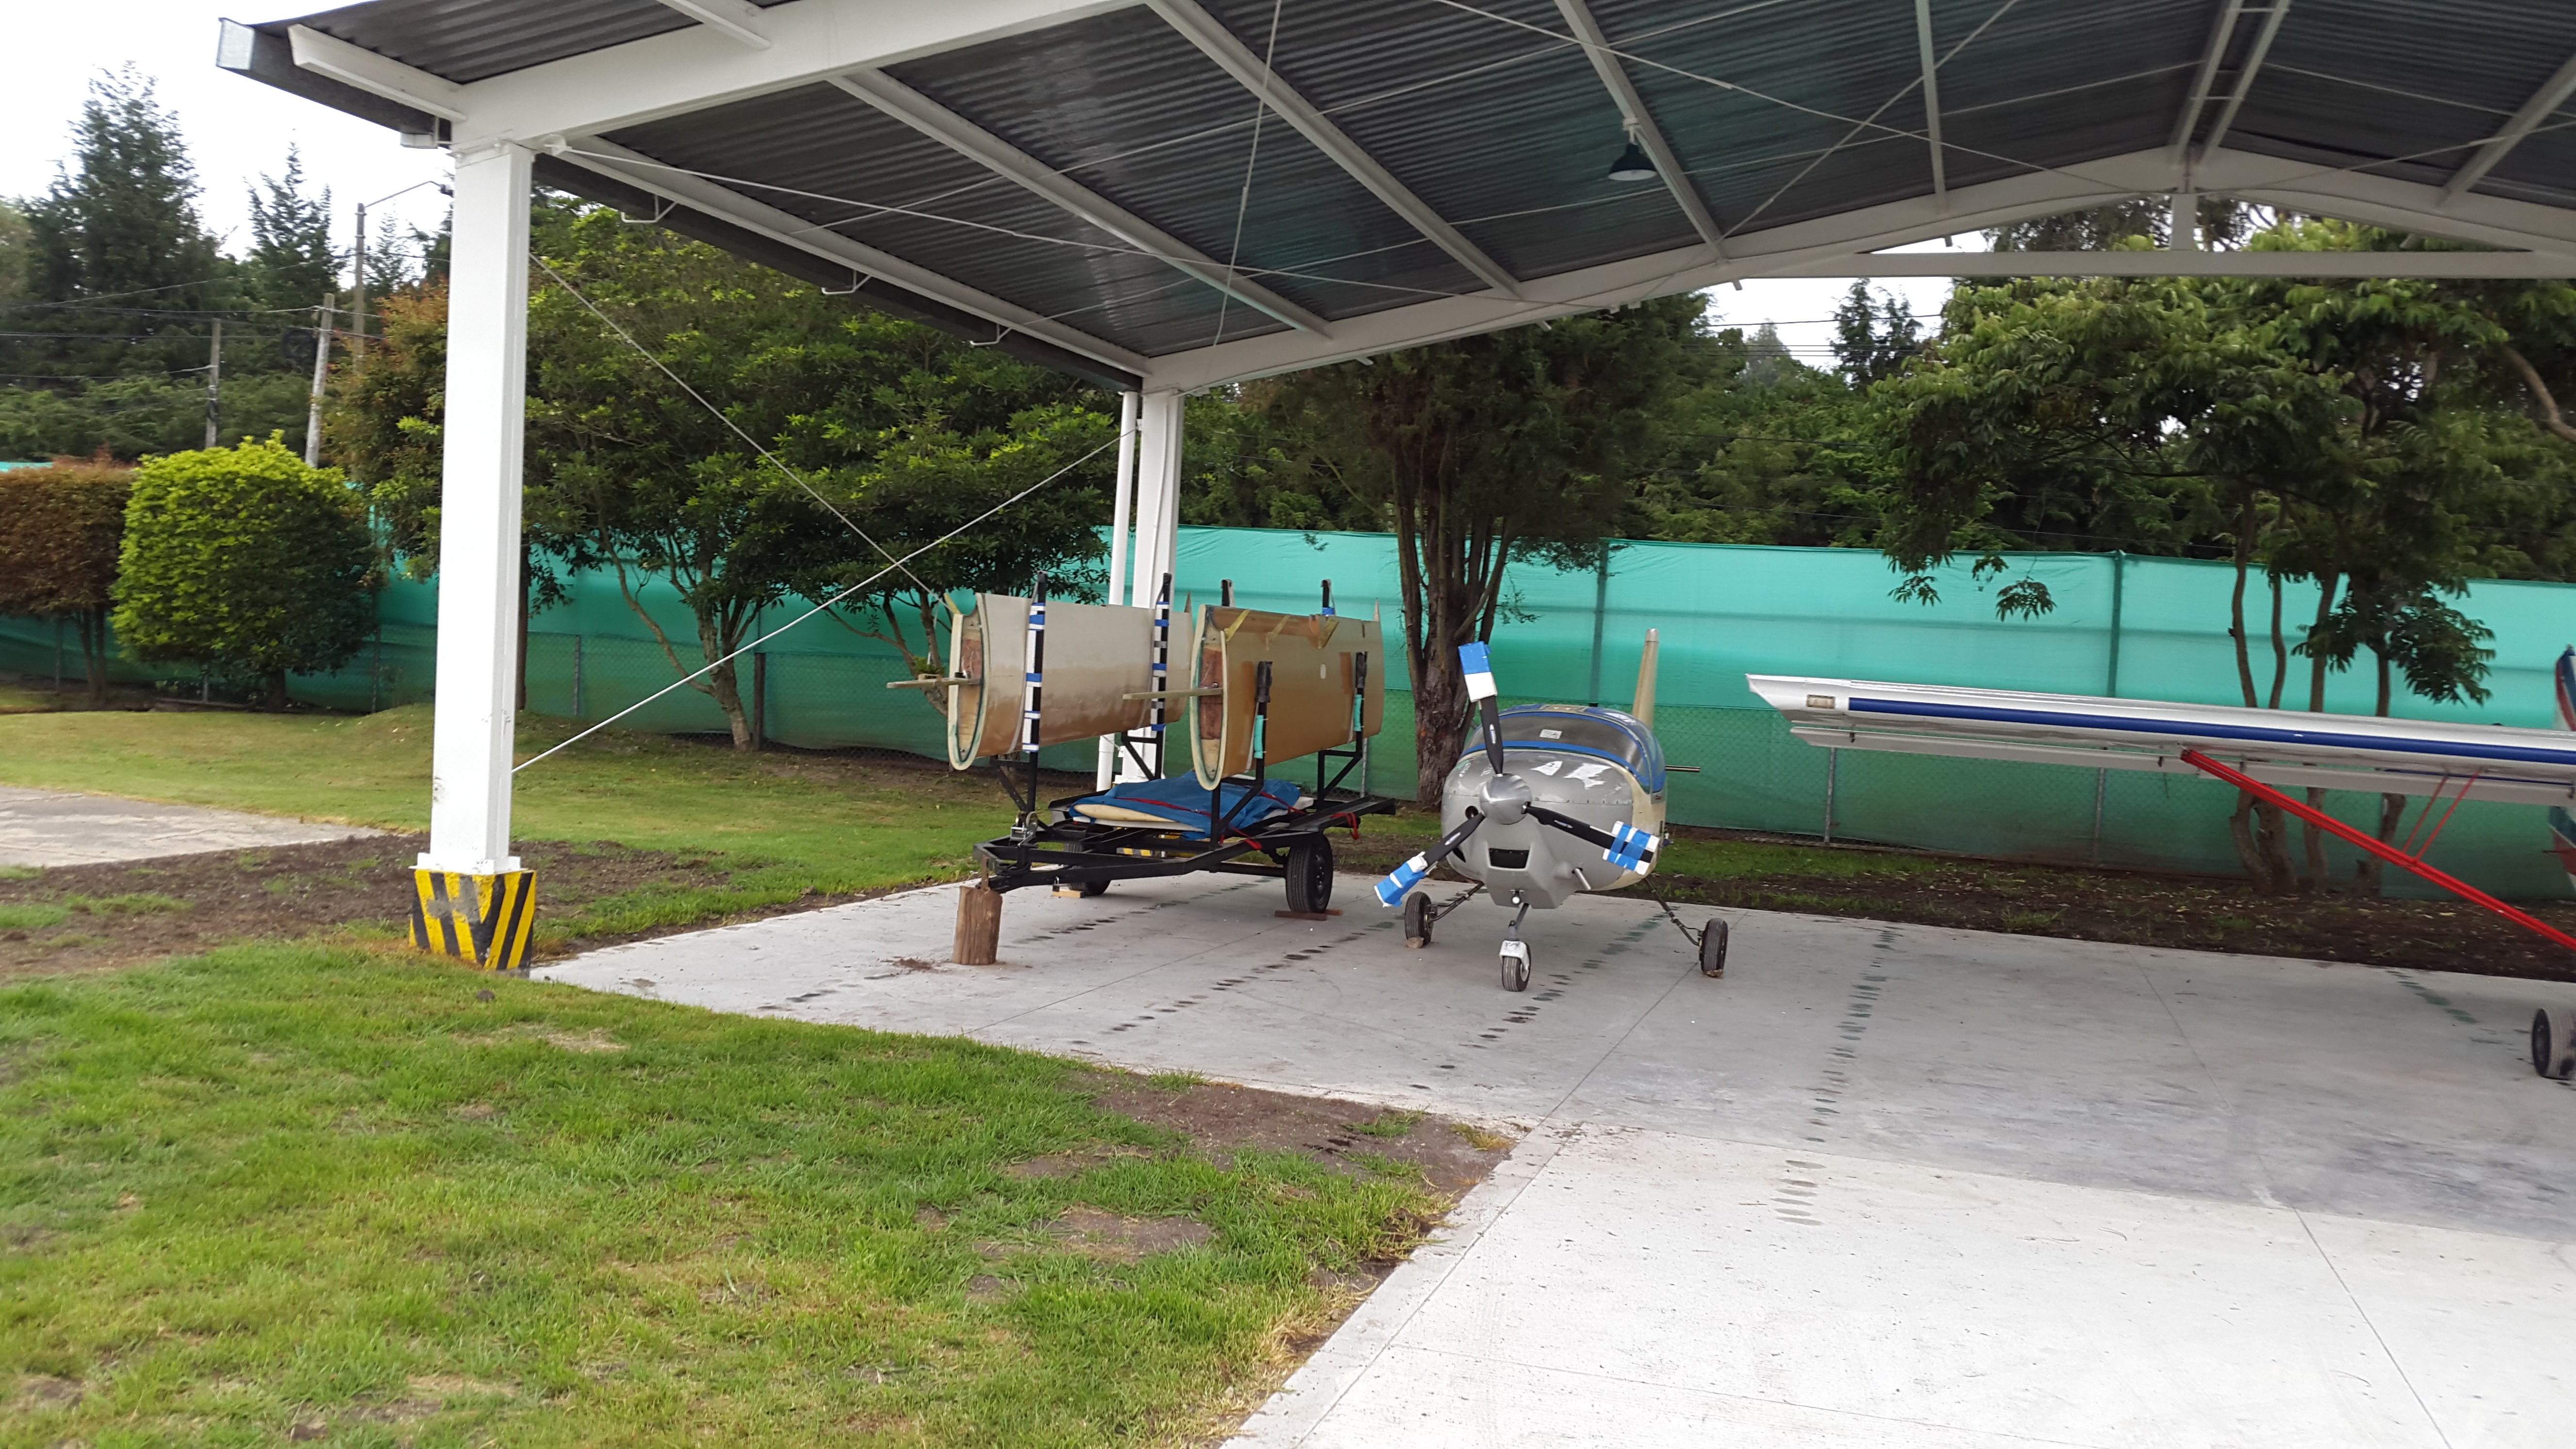
Finally after 12 years ....HJ460 is now in its hangar awaiting paint. We fired up the engine and the dynon and much to my surprise everthing works
I realize that this is not over and I have merely completed phase 1.
HJ460 is a "fast build" (hahahaha) with gel coat over wings and fuselage and the cloth flying surfaces are filled and sanded. She has the minor dings and epoxy drips from 12 years of constructions.
PAINTINGÂ the plan suggested by the Colombian painter is
- sand gel coat with fine paper
- fill all visible dings with micro
- apply epoxy primer
- sand
- fill with polyester filler
- re primer
- paint (white) with aircraft paint.
- Lacquer on top
Any input gratefully received. Does this sound like a plan? Is polyester car filler appropriate?
Many thanks
WIll
William Daniell
LONGPORT
+57 310 295 0744
| | - The Matronics Europa-List Email Forum - | | | Use the List Feature Navigator to browse the many List utilities available such as the Email Subscriptions page, Archive Search & Download, 7-Day Browse, Chat, FAQ, Photoshare, and much more:
http://www.matronics.com/Navigator?Europa-List |
|
| Description: |
|
| Filesize: |
2.69 MB |
| Viewed: |
4974 Time(s) |
|
|
|
| Back to top |
|
 |
rampil
Joined: 04 May 2007
Posts: 870
|
| Posted: Thu Feb 02, 2017 6:15 am Post subject: Re: Painting |
|
|
I would not mix chemistries. Use expo micro, not polyester for filling.


When you say aircraft paint, you realize that there are dozens of different

kinds of aircraft paint, some suitable for fabric, some for metal and composite.


I recommend Dupont Imron with Clearcoat finish.  This is my choice as it is

extremely hard and scratch resistant. It is expensive and is (cyanide) toxic. Have a professional spray it for you. My 13 year old is still looking good.
| | - The Matronics Europa-List Email Forum - | | | Use the List Feature Navigator to browse the many List utilities available such as the Email Subscriptions page, Archive Search & Download, 7-Day Browse, Chat, FAQ, Photoshare, and much more:
http://www.matronics.com/Navigator?Europa-List |
|
_________________
Ira N224XS |
|
| Back to top |
|
|
davidjoyce(at)doctors.org
Guest
|
| Posted: Thu Feb 02, 2017 12:36 pm Post subject: Painting |
|
|
William, If you use gel coat there is just a single layer to spray on and then you wet & dry sand most of it off, going progressively through 400, 1200 and 2000 grit to produce the most superb and very durable finirsh. You do not need any primer or UV barrier as gel coat includes those.
Regards, David, GXSDJ
On 2017-02-02 11:45, William Daniell wrote: | Quote: | Finally after 12 years ....HJ460 is now in its hangar awaiting paint. We fired up the engine and the dynon and much to my surprise everthing works
I realize that this is not over and I have merely completed phase 1.HJ460 is a "fast build" (hahahaha) with gel coat over wings and fuselage and the cloth flying surfaces are filled and sanded. She has the minor dings and epoxy drips from 12 years of constructions.
PAINTING the plan suggested by the Colombian painter is - sand gel coat with fine paper
- fill all visible dings with micro
- apply epoxy primer
- sand
- fill with polyester filler
- re primer
- paint (white) with aircraft paint.
- Lacquer on top
Any input gratefully received. Does this sound like a plan? Is polyester car filler appropriate? Many thanks
WIll
William Daniell
LONGPORT +57 310 295 0744
|
| | - The Matronics Europa-List Email Forum - | | | Use the List Feature Navigator to browse the many List utilities available such as the Email Subscriptions page, Archive Search & Download, 7-Day Browse, Chat, FAQ, Photoshare, and much more:
http://www.matronics.com/Navigator?Europa-List |
|
|
|
| Back to top |
|
|
h&jeuropa
Joined: 07 Nov 2006
Posts: 655
|
| Posted: Fri Feb 03, 2017 11:12 am Post subject: Re: Painting |
|
|
Will,
Your Europa build manual has a chapter (36) concerning finishing your airplane. It states:
1. The molded parts (fuselage, wings, cowls etc) are ready to paint only requiring a light sanding. We washed the parts with soap and warm water; then sanded with 280-320 grit sandpaper to remove any shine. (Europa says 360 grit but that wasnât available here).
2. The foam filled flying surfaces (flaps, ailerons, tailplanes and rudder) need filled before painting. We washed them first as well.
The foam filled flying surfaces must be post cured for 8-10 hours at 40-50 deg C. We used epoxy mixed with expancel (supplied with the kit) to fill the weave. You want a pretty dry mixture (as much expancel as you can get into the epoxy so it isnât shiny). Best results are if each batch is mixed in exactly the same proportions because if you have to refill a spot and one batch was wetter, it will be harder than the filler next to it which makes sanding evenly very difficult. We mixed a set amount of epoxy and then measured the expancel (by volume 1 part mixed epoxy to 10 parts expancel worked for us). We mixed some plain epoxy and wiped a little on the weave with an old sock so that the dry expancel mixture would adhere. Then let the expancel dry thoroughly. In damp, cool Michigan, that could take days! Then sand to properly contour, refilling & sanding as necessary.
We used expancel/epoxy to smooth and fill the joints where the fuselage halves meet and the closeout panels on the top wing surfaces. Probably spread the filler to an area 6-8 inches wide on either side of the seam to get a nice blended surface.
There were a series of articles in Sport Aviation around 2005 that we used for guidance. The articles are available as a book from EAA, http://www.eaa.org/en/eaa-shop/media/aviation-books/2256137300000__how-to-paint-your-own-airplane
We followed the articles closely and used Poly Fiberâs products and instructions for applying the products. We washed the parts with 310 Alkaline cleaner mixed 20:1 with water, rinsed thoroughly and used Prep Wipe. We then used UV Smooth Prime on the entire airframe, both molded parts and foam filled parts to provide UV protection for the fiberglass. It also gave a hard finish without pinholes. This was followed by Epoxy Primer EP420 and finally Aerothane final finish. We then color sanded. Probably the epoxy primer was not necessary.
We were advised not to use polyester automotive filler because it does not remain flexible enough to handle the movement of composites. At that time (2005) we were also advised not to use automotive paint for the same reason, but many seem to have success with it. As Ira states, we saw his airplane when we were at Custom flight Creations in December and it looks great!
There are as many opinions about painting as their are Europas! This is how we did ours and we are happy with the results. Hopefully Bud Yerly will comment as he has much more experience, especially using the products available today.
Jim & Heather
| | - The Matronics Europa-List Email Forum - | | | Use the List Feature Navigator to browse the many List utilities available such as the Email Subscriptions page, Archive Search & Download, 7-Day Browse, Chat, FAQ, Photoshare, and much more:
http://www.matronics.com/Navigator?Europa-List |
|
|
|
| Back to top |
|
|
wdaniell.longport(at)gmai
Guest
|
| Posted: Fri Feb 03, 2017 12:47 pm Post subject: Painting |
|
|
 thanks very usefulÂ
William Daniell
LONGPORT
+57 310 295 0744
On Fri, Feb 3, 2017 at 2:12 PM, h&jeuropa <butcher43(at)att.net (butcher43(at)att.net)> wrote:
| Quote: | --> Europa-List message posted by: "h&jeuropa" <butcher43(at)att.net (butcher43(at)att.net)>
Will,
Your Europa build manual has a chapter (36) concerning finishing your airplane. It states:
1.    The molded parts (fuselage, wings, cowls etc) are ready to paint only requiring a light sanding. We washed the parts with soap and warm water; then sanded with 280-320 grit sandpaper to remove any shine. (Europa says 360 grit but that wasnât available here).
2.   The foam filled flying surfaces (flaps, ailerons, tailplanes and rudder) need filled before painting. We washed them first as well.
The foam filled flying surfaces must be post cured for 8-10 hours at 40-50 deg C. We used epoxy mixed with expancel (supplied with the kit) to fill the weave.  You want a pretty dry mixture (as much expancel as you can get into the epoxy so it isnât shiny). Best results are if each batch is mixed in exactly the same proportions because if you have to refill a spot and one batch was wetter, it will be harder than the filler next to it which makes sanding evenly very difficult. We mixed a set amount of epoxy and then measured the expancel (by volume 1 part mixed epoxy to 10 parts expancel worked for us). We mixed some plain epoxy and wiped a little on the weave with an old sock so that the dry expancel mixture would adhere. Then let the expancel dry thoroughly. In damp, cool Michigan, that could take days! Then sand to properly contour, refilling & sanding as necessary.
We used expancel/epoxy to smooth and fill the joints where the fuselage halves meet and the closeout panels on the top wing surfaces. Probably spread the filler to an area 6-8 inches wide on either side of the seam to get a nice blended surface.
There were a series of articles in Sport Aviation around 2005 that we used for guidance. The articles are available as a book from EAA, http://www.eaa.org/en/eaa-shop/media/aviation-books/2256137300000__how-to-paint-your-own-airplane
We followed the articles closely and used Poly Fiberâs products and instructions for applying the products. We washed the parts with 310 Alkaline cleaner mixed 20:1 with water, rinsed thoroughly and used Prep Wipe. We then used UV Smooth Prime on the entire airframe, both molded parts and foam filled parts to provide UV protection for the fiberglass. It also gave a hard finish without pinholes. This was followed by Epoxy Primer EP420 and finally Aerothane final finish. We then color sanded. Probably the epoxy primer was not necessary.
We were advised not to use polyester automotive filler because it does not remain flexible enough to handle the movement of composites. At that time (2005) we were also advised not to use automotive paint for the same reason, but many seem to have success with it. As Ira states, we saw his airplane when we were at Custom flight Creations in December and it looks great!
There are as many opinions about painting as their are Europas! This is how we did ours and we are happy with the results. Hopefully Bud Yerly will comment as he has much more experience, especially using the products available today.
Jim & Heather
Read this topic online here:
http://forums.matronics.com/viewtopic.php?p=465719#465719
====================================
pa-List" rel="noreferrer" target="_blank">http://www.matronics.com/Navigator?Europa-List
====================================
FORUMS -
eferrer" target="_blank">http://forums.matronics.com
====================================
WIKI -
errer" target="_blank">http://wiki.matronics.com
====================================
b Site -
     -Matt Dralle, List Admin.
rel="noreferrer" target="_blank">http://www.matronics.com/contribution
====================================
|
| | - The Matronics Europa-List Email Forum - | | | Use the List Feature Navigator to browse the many List utilities available such as the Email Subscriptions page, Archive Search & Download, 7-Day Browse, Chat, FAQ, Photoshare, and much more:
http://www.matronics.com/Navigator?Europa-List |
|
|
|
| Back to top |
|
|
|
|
You cannot post new topics in this forum
You cannot reply to topics in this forum
You cannot edit your posts in this forum
You cannot delete your posts in this forum
You cannot vote in polls in this forum
You cannot attach files in this forum
You can download files in this forum
|
Powered by phpBB © 2001, 2005 phpBB Group
|

