 |
Matronics Email Lists
Web Forum Interface to the Matronics Email Lists
|
| View previous topic :: View next topic |
| Author |
Message |
owl40188(at)yahoo.com
Guest
|
 Posted: Mon Nov 20, 2006 7:25 am Post subject: Control Stick Engagement into Control Stick Base. Posted: Mon Nov 20, 2006 7:25 am Post subject: Control Stick Engagement into Control Stick Base. |
 |
|
I have been trying to insert the Control Stick into the Control Base this morning.  I am not sure how much engagement is needed between the two.  Right now the control stick only goes about as far as the weld between the two tubes in the Base. A little less than half of the unpainted portion of the control stick is not engaged.  Does this sound correct?


 By the way it took about 2 hrs of working on the inside of the Control Base tubes to get the Control Stick to fit inside it.


 thanks


 Niko

 40188


 [quote][b]
| | - The Matronics RV10-List Email Forum - | | | Use the List Feature Navigator to browse the many List utilities available such as the Email Subscriptions page, Archive Search & Download, 7-Day Browse, Chat, FAQ, Photoshare, and much more:
http://www.matronics.com/Navigator?RV10-List |
|
|
|
| Back to top |
|
 |
jesse(at)itecusa.org
Guest
|
| Posted: Mon Nov 20, 2006 8:02 am Post subject: Control Stick Engagement into Control Stick Base. |
|
|
Ideally, you want the stick to fit in as far as possible, which means using a round/half-round file to take down the inside of the weld so it fits. You could also use a sanding drum that’s a little smaller than the stick to take it down. Usually it is just a couple of burrs in there keeping it from going further. On our sticks I think we got about ¾ or a little more of the unpainted portion inside. The more you have sticking down inside the more strength you will have, and the less likely you will have a wobble in your stick, which is something I have noticed in a number of -10’s out there, both flying and in progress.
Jesse Saint
I-TEC, Inc.
jesse(at)itecusa.org (jesse(at)itecusa.org)
www.itecusa.org
W: 352-465-4545
C: 352-427-0285
From: owner-rv10-list-server(at)matronics.com [mailto:owner-rv10-list-server(at)matronics.com] On Behalf Of Niko
Sent: Monday, November 20, 2006 10:25 AM
To: Matronics
Subject: Control Stick Engagement into Control Stick Base.
I have been trying to insert the Control Stick into the Control Base this morning. I am not sure how much engagement is needed between the two. Right now the control stick only goes about as far as the weld between the two tubes in the Base. A little less than half of the unpainted portion of the control stick is not engaged. Does this sound correct?
By the way it took about 2 hrs of working on the inside of the Control Base tubes to get the Control Stick to fit inside it.
thanks
Niko
40188
| Quote: |
href="http://www.aeroelectric.com">www.aeroelectric.com
href="http://www.buildersbooks.com">www.buildersbooks.com
href="http://www.kitlog.com">www.kitlog.com
href="http://www.homebuilthelp.com">www.homebuilthelp.com
href="http://www.matronics.com/contribution">http://www.matronics.com/chref="http://www.matronics.com/Navigator?RV10-List">http://www.matronics.com/Navigator?RV10-List
|
-- Release Date: 11/20/2006 6:48 AM -- Release Date: 11/20/2006 6:48 AM [quote][b]
| | - The Matronics RV10-List Email Forum - | | | Use the List Feature Navigator to browse the many List utilities available such as the Email Subscriptions page, Archive Search & Download, 7-Day Browse, Chat, FAQ, Photoshare, and much more:
http://www.matronics.com/Navigator?RV10-List |
|
|
|
| Back to top |
|
|
Tim(at)MyRV10.com
Guest
|
| Posted: Mon Nov 20, 2006 9:24 am Post subject: Control Stick Engagement into Control Stick Base. |
|
|
Good point Jesse. 2 additional comments...
1) I used a dremel tool sanding drum. Worked well to
deal with the inside of the bore.
2) Regarding stick wobble/slop: I just dealt with this
myself. I noticed I had a bit of looseness in the stick.
At OSH I compared it to Vic's and he had some too. Over
the last couple weeks I actually got rid of mine completely.
Here's more...
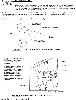
The source of the slop in my case was actually the OD of the
BUSHING 065 x .375 x 2.313 shown on page 39-8. (see attached
.jpg)
Or more accurately, the sloppy hole in my WD-1011-L & R.
The way bushings normally work, you want them to have one
movable surface, the ID that rides on the removable bolt.
You want the OD of the bushing to be fixed to the WD-1011
somewhat. The AN4-27 bolt that holds the assembly together
doesn't get cranked really tight, hence the castle nut. You
want to trim the bushing so it's longer than the WD-10ll,
but still fits in the mating part. If necessary, you trim
the WD-1011 shorter. The slop in my case though was the OD
of that bushing, as I mentioned. I could stick the bushing
in, then stick the bolt through, and rock the bolt up and
down slightly, feeling the slop. The reamed ID of the
bushing was very snug on the bolt, but the OD was slopping
around in the WD-1011.
I fixed it by using a loctite product "Loctite quick metal
660" that I had sitting around from a previous bushing
repair a couple years ago.
http://www.chemicalcontacts.co.za/teroson/retainers.htm
You could probably use many of the ones on this page.
Basically, it just fills the gap and solidifies the
bushing to the WD-1011, so it now pivots on the nicely
fit bolt. When tightening the AN4-27, you just bring it
up tight, then loosen it to the next castle, so it's
not sloppy, but non-restrictive. Wala, no more stick slop.
The only downside is in the ultra-ultra-long term when
you want to replace the bushing. It'll be tight in the
WD-1011, and will probably require you to drill out the
bushing to the OD size so you can install a new one.
Tim Olson - RV-10 N104CD - Flying
do not archive
Jesse Saint wrote:
| Quote: | Ideally, you want the stick to fit in as far as possible, which means
using a round/half-round file to take down the inside of the weld so it
fits. You could also use a sanding drum thats a little smaller than
the stick to take it down. Usually it is just a couple of burrs in
there keeping it from going further. On our sticks I think we got about
¾ or a little more of the unpainted portion inside. The more you have
sticking down inside the more strength you will have, and the less
likely you will have a wobble in your stick, which is something I have
noticed in a number of -10s out there, both flying and in progress.
Jesse Saint
I-TEC, Inc.
jesse(at)itecusa.org <mailto:jesse(at)itecusa.org>
www.itecusa.org <http://www.itecusa.org>
W: 352-465-4545
C: 352-427-0285
------------------------------------------------------------------------
*From:* owner-rv10-list-server(at)matronics.com
[mailto:owner-rv10-list-server(at)matronics.com] *On Behalf Of *Niko
*Sent:* Monday, November 20, 2006 10:25 AM
*To:* Matronics
*Subject:* Control Stick Engagement into Control Stick Base.
I have been trying to insert the Control Stick into the Control Base
this morning. I am not sure how much engagement is needed between the
two. Right now the control stick only goes about as far as the weld
between the two tubes in the Base. A little less than half of the
unpainted portion of the control stick is not engaged. Does this sound
correct?
By the way it took about 2 hrs of working on the inside of the Control
Base tubes to get the Control Stick to fit inside it.
thanks
Niko
40188
*
href="http://www.aeroelectric.com">www.aeroelectric.com
href="http://www.buildersbooks.com">www.buildersbooks.com
href="http://www.kitlog.com">www.kitlog.com
href="http://www.homebuilthelp.com">www.homebuilthelp.com
href="http://www.matronics.com/contribution">http://www.matronics.com/chref="http://www.matronics.com/Navigator?RV10-List">http://www.matronics.com/Navigator?RV10-List
*
-- Release Date: 11/20/2006 6:48 AM -- Release Date: 11/20/2006 6:48 AM
*
*
|
| | - The Matronics RV10-List Email Forum - | | | Use the List Feature Navigator to browse the many List utilities available such as the Email Subscriptions page, Archive Search & Download, 7-Day Browse, Chat, FAQ, Photoshare, and much more:
http://www.matronics.com/Navigator?RV10-List |
|
| Description: |
|
| Filesize: |
75.96 KB |
| Viewed: |
192 Time(s) |
|
|
|
| Back to top |
|
|
owl40188(at)yahoo.com
Guest
|
| Posted: Mon Nov 20, 2006 9:34 am Post subject: Control Stick Engagement into Control Stick Base. |
|
|
Thanks for the reply Jesse.


 In my case its more than just a burr.  One of the tubes is extending about 1/32" so I have to sand down quiet a bit.  As far as the wobble I would think that some proseal in the area when installing the parts will solve it.  I thought it might be a problem with the function of the stick because it would be extending further forward.


 thanks again


 Niko

 40188

 ---
| | - The Matronics RV10-List Email Forum - | | | Use the List Feature Navigator to browse the many List utilities available such as the Email Subscriptions page, Archive Search & Download, 7-Day Browse, Chat, FAQ, Photoshare, and much more:
http://www.matronics.com/Navigator?RV10-List |
|
|
|
| Back to top |
|
|
jesse(at)itecusa.org
Guest
|
| Posted: Mon Nov 20, 2006 10:57 am Post subject: Control Stick Engagement into Control Stick Base. |
|
|
By reading the page you sent (and according to our installation), it seems

to me that the bushing is supposed to be tightened with the bolt (so it is

fixed with the bolt), then the WD-1011 is pivoting on the bushing, not the

bushing pivoting on the bolt.  Am I way off here.  I would think the allow

the bolt to be loose would be less safe than greasing the mate that you

glued so the pivot is there.  I think that's why it says, "Debur the ends of

the control stick base bushing so that they slide easily inside the

WD-1011..."  Either way there are parts rubbing, but that would certainly

explain why the bushing needs to be longer than the WD-1011.


Am I way off?  I am sure it will work either way, but to fix wobble in ours

I turned down the end of the bushing so there is no play on the WD-1011.


Well, anyway, wobble is bad if you can help it.  At least it is

disconcerting when you are flying autopilot and you touch the stick and it

feels loose.  Going with the dremel sanding drum either on a dremel or a die

grinder will do the trick.  It should also help with the clearance with the

instrument panel, I would think, making sure the engagement is sufficient.


Jesse Saint

I-TEC, Inc.

jesse(at)itecusa.org

www.itecusa.org

W: 352-465-4545

C: 352-427-0285


--
| | - The Matronics RV10-List Email Forum - | | | Use the List Feature Navigator to browse the many List utilities available such as the Email Subscriptions page, Archive Search & Download, 7-Day Browse, Chat, FAQ, Photoshare, and much more:
http://www.matronics.com/Navigator?RV10-List |
|
|
|
| Back to top |
|
|
Tim(at)MyRV10.com
Guest
|
| Posted: Mon Nov 20, 2006 11:41 am Post subject: Control Stick Engagement into Control Stick Base. |
|
|
Reply inline...
Jesse Saint wrote:
| Quote: |
By reading the page you sent (and according to our installation), it seems
to me that the bushing is supposed to be tightened with the bolt (so it is
fixed with the bolt), then the WD-1011 is pivoting on the bushing, not the
bushing pivoting on the bolt. Am I way off here. I would think the allow
the bolt to be loose would be less safe than greasing the mate that you
glued so the pivot is there. I think that's why it says, "Debur the ends of
the control stick base bushing so that they slide easily inside the
WD-1011..." Either way there are parts rubbing, but that would certainly
explain why the bushing needs to be longer than the WD-1011.
|
In most mechanical systems, the bushing is meant to move around on
the removable hardware...the bolt. As you noticed, that's why you want
to ensure the bushing is longer than the other part, so the
steel-to-steel is eliminated at the ends. Also, with slop if that
bushing wasn't secured, that outer part could slide back and forth
and still rub on the other steel part....not good. With the bushing
captive in the WD-1011, you're now limited to brass-on-steel movement,
with the endcaps from the other steel part only rubbing brass.
You'll still need to deburr the ends, because you want to be able to
easily slide the brass tube inside the steel....but deburring isn't
going to have any effect, even if you put it together the other
way, on any wear inside. Now, if you do capture that bushing inside
the WD-1011, you will certainly not want to crank way down on the
pinching bolt, or you'll induce a lot more friction into the system.
I should note that ideally, you should not have to use loctite or
anything on the WD-1011. Ideally it would be a high-friction
almost press-fit. But, there was so much slop in there that I
had no choice but to use a gap filler. I had considered
having a larger OD bushing made up that was a tight fit, but
that just wastes time and money and effort. You really don't
want the thing revolving around inside the WD-1011 anyway.
But, if you didn't have much slop, it really wouldn't be a huge
problem, either. At least it isn't steel-on-steel...except if
the steel ends of the WD-1011 start to contact the other steel
control linkage.
The fact that it's a castle nut spec'd there also indicates
that it isn't necessarily a high-torque application. Just like
doing wheel bearings, snug, then back off so they spin freely,
and use a cotter pin. Nobody questions the safety of a wheel
that spins freely and the nut is held by a cotter pin, right?
| Quote: | Am I way off? I am sure it will work either way, but to fix wobble in ours
I turned down the end of the bushing so there is no play on the WD-1011.
Well, anyway, wobble is bad if you can help it. At least it is
disconcerting when you are flying autopilot and you touch the stick and it
feels loose. Going with the dremel sanding drum either on a dremel or a die
grinder will do the trick. It should also help with the clearance with the
instrument panel, I would think, making sure the engagement is sufficient.
|
I agree with that. I remember not really thinking of it, then
about 100 hours ago I noticed it one smooth flight, and got
paranoid about the wobble. I inspected the linkages and didn't
see any issues, so decided to put it on the list to dig
into at a convenient time. When Vic flew it and noticed the
slop was worse than his, it got moved higher on the list,
so now it's done. It now is completely slop free, and the
controls are still smooth and light. Everything's very good,
and I know the steel parts are rubbing down there. It's
the little things that bring a smile sometimes. 
[quote] Jesse Saint
I-TEC, Inc.
jesse(at)itecusa.org
www.itecusa.org
W: 352-465-4545
C: 352-427-0285
--
| | - The Matronics RV10-List Email Forum - | | | Use the List Feature Navigator to browse the many List utilities available such as the Email Subscriptions page, Archive Search & Download, 7-Day Browse, Chat, FAQ, Photoshare, and much more:
http://www.matronics.com/Navigator?RV10-List |
|
|
|
| Back to top |
|
|
capsteve
Joined: 09 Jan 2006
Posts: 111
Location: NIAGARA FALLS NY
|
| Posted: Mon Nov 20, 2006 8:09 pm Post subject: Control Stick Engagement into Control Stick Base. |
|
|
I may be wrong but I think the bushing was designed to be captive. They

purposefully made it longer than the weld mount to tighten under the bolt. I

have the same slop, but I'm just replacing the weld mount, being careful to

maintain a tight press fit between the sick and bushing.....

Steve

4005

[quote] --
| | - The Matronics RV10-List Email Forum - | | | Use the List Feature Navigator to browse the many List utilities available such as the Email Subscriptions page, Archive Search & Download, 7-Day Browse, Chat, FAQ, Photoshare, and much more:
http://www.matronics.com/Navigator?RV10-List |
|
|
|
| Back to top |
|
|
owl40188(at)yahoo.com
Guest
|
| Posted: Wed Nov 22, 2006 9:16 am Post subject: Control Stick Engagement into Control Stick Base. |
|
|
Thanks for all the replies on this.  I sent the question to Vans and got a reply from Ken Scott.


 He said


  "The stick should bottom out in the base...which would be about the weld line."


 Niko

 40188


 ---
| | - The Matronics RV10-List Email Forum - | | | Use the List Feature Navigator to browse the many List utilities available such as the Email Subscriptions page, Archive Search & Download, 7-Day Browse, Chat, FAQ, Photoshare, and much more:
http://www.matronics.com/Navigator?RV10-List |
|
|
|
| Back to top |
|
|
|
|
You cannot post new topics in this forum
You cannot reply to topics in this forum
You cannot edit your posts in this forum
You cannot delete your posts in this forum
You cannot vote in polls in this forum
You cannot attach files in this forum
You can download files in this forum
|
Powered by phpBB © 2001, 2005 phpBB Group
|

