 |
Matronics Email Lists
Web Forum Interface to the Matronics Email Lists
|
| View previous topic :: View next topic |
| Author |
Message |
rehn(at)rockisland.com
Guest
|
 Posted: Thu Sep 18, 2008 10:08 am Post subject: Finishing tips Posted: Thu Sep 18, 2008 10:08 am Post subject: Finishing tips |
 |
|
I found this to be a very good article.
Jerry
_____
Finishing a composite airplane
Foreword
I wrote this because I see a lot of people struggling with finishing their
airplanes and I don't see anything well written on the subject anywhere. I
have seen a number of articles in magazines and books but they all seem to
be written by people who are writers rather then builders and never actually
did the job, let alone would be good at it. The latest example of such
article is in Sport Aviation 2/2003 named The Joy of Sanding, four pages
filled but nothing helpful about how to do the job. I, on the other hand, am
no writer and English is a second language for me to top it off, so bear
with me. My own experience comes from building composite tools and
production parts for kit airplanes as a business and from doing all the
finish work on an award winning Lancair IV P for Mike Shooner under the
command of Arthur Gallant who himself received Oshkosh Grand Champion for
his Lancair 320. I learned a lot on that project. The following describes in
great details the techniques I use to obtain a perfect straight wave free
airfoil shape on wings and the fuselage, and do it with the minimum effort
and cost without spending years on it (or so I think).
Ok, lets start filling.
The process goes basically in two stages, first, we shape/contour the
surface, second, we perfect the surface for the paint application. In other
articles you probably read directions about looking for "The Low Spots" with
all kinds of tricks on how to identify them and fill them, then sand, then
recheck and refill again and again and again. This is the wrong way to do
it. Not only is this technique time consuming, achieving a wave free surface
by a patchwork of fillings is just about impossible. The right way to do it
is to fill all of the surface (meaning like one side of a wing or a
fuselage) at once with a coat of filler sufficiently thick enough to fully
fill all the lows, then sand the whole surface as one uniform plain ONCE,
without the need of refilling again. The amount of filler to sand off may
seem overwhelming at first but the use of proper sanding technique described
later on makes this task rather effortless. Using this technique you never
look for low spots, instead you keep sanding until the highs start coming up
through the filler. Some airplanes, because of their building process will
have deep depressions, like in the place of spars or joints, which would be
difficult to fill sufficiently deep and yet smooth in one fill. The builders
natural tendency would be just to do the first big fill, sand to the shape
and then refill the areas of these low depressions as needed. It needs to be
done the other way around, you need to fill these deep depression first,
however that first fill must still stay below the intended finished surface
height, sanding through the top fill into the first filler coat would create
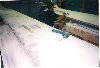
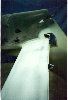
hard spots and uneven sanding properties. The picture below shows a good
example of this first head start fill where we had a significant depression
in the skin in the spar area and the joggle joint on the leading edge.
I strongly recommend spraying a light coat of black primer, before you start
filling, Even thou this step is not absolutely necessary it is very helpful
in guiding where to direct more sanding and when to change to finer
sandpaper grade. The filler becomes translucent as it gets thinner and the
black color starts showing through as dark spots indicating you are getting
close to the skin surface.
The filler is a plain mix of epoxy and glass micro balloons, commonly called
"micro". It's not all that easy to work with but it's the lightest filler
there is with good strength and stability after its cured. I would not say
you can not use one of the ready to apply premixed epoxy fillers like
SuperFil but be aware that despite all the advertising hype this filler is
about twice as heavy as home made micro and it will cost a lot more as a
number of gallons of filler are used. The epoxy resin used to mix micro must
be one of the low viscosity types that will allow high ratio of microbaloons
to be mixed in. I have used Aeropoxy and Jeffco which both work well. I mix
it in a large salad bowl about 2/3 to 3/4 of a gallon at a time which is
about as much as I can handle. Mixing is done with a classic flat paint
mixing stick and in a slow motion, trying to mix it fast will not get the
job done any sooner, you will only blow half of the microbaloons in to the
air. The finished mix must be fairly dry, keep adding microbaloons until it
becomes difficult to mix. As long as the mix is visibly flowing and leveling
by itself its still too wet, another indicator the mix still needs more
microbaloons is that the surface turns glossy when you let it sit a minute
thats the extra epoxy migrating to the surface. Properly mixed micro
spreads with moderate difficulty and fairly high amount of pressure is
required. If it spreads easily it's too wet.
Be aware that micro has one distinct characteristic, that is, the two
materials - microbaloons and epoxy tend to separate from one another when
still. This characteristic is good for the fact that the resin migrates onto
the surface being filled creating a real good bond to it. The bad part is if
you have to refill an area, the resin migrates into the surface of the
previously applied micro creating hard spots when sanding it. These hard
spots create raised areas, a real pain to deal with so try to avoid that.
Some people squeegee pure resin on the surface to wet it out just prior
applying the micro. I see no reason or purpose of that, I think they got it
from the way the plaster skim coat is applied on the drywall.
To apply the micro to the surface, use a 6-inch metal trowel. Blob all the
micro (the mixed batch) to the middle of the surface and then trowel it in
the direction toward yourself first to one edge, then run around and to the
other side edge. Always go in the direction of the curve. The trowel is run
very flat to the surface and good pressure, you hold it by both hands by the
top part of the blade with all fingers on top and thumbs in the bottom the
get a good grip, bend the handle up about 30 degrees to get it out of the
way. The low angle and plenty of pressure are important because that is what
pushes the air bubbles that got mixed in to the micro out of the micro. You
will notice that at first it doesn't seem to want to stick and wants to roll
off, but then when the surface starts to get wetted out, it goes on pretty
smooth. You don't have much time thou, if you fuss with it too long or try
to redo an area you did a few minutes ago, it will start to tear up, lift
off and break up. This is because o lot of resin migrated onto the surface
and the micro starts to slide on it and unstuck from the surface easily,
remember this important tip, if you make a pass and you see the micro
breaking up make a pass in the opposite direction, that will smooth it right
up, but then just stop fussing with it. The thickness if the coat should be
somewhere between 1/8 to ¼ of an inch, you shouldn't have any lows on your
surface deeper then 1/8 of an inch .A little bit too much is better then a
little bit not enough because it's still easier to sand off some extra then
having to refill again. It takes some practice, if you want to see how thick
it is , just dip a Popsicle stick in to it. As a general rule, start the
filling on smaller, single curve surfaces like the tail, then large single
curve surfaces like wings, and last the most difficult compound curved parts
on the fuselage, engine cowl, wing fillet so that the level of difficulty
goes up along with your filling and sanding learning curve. On filling the
compound shapes the flat metal trowel will not work, for those you need to
use a flexible plastic squeegee. With 4 fingers on top and the thumb against
the bottom you can "cap" the squeegee so it follows the curve. Home depot
sells nice ones in a tri pack of 5, 4 and 2.5 inch wide. On a part like a
fuselage where you will not be able to fill the whole surface at once, try
to divide it so bring the edges to a break like a corner where blending of
one fill into another is easiest. If the fuselage is oval, do the break
where the curve is the sharpest, its much easier to blend it there then on
the shallow curve. It should take about 2 hours to fill one wing panel on a
small two-seater, up to about 4 hours on a big four-seater.
Sanding
There are three aspects of the sanding technique that will enable you to
arrive to that perfect straight wave free surface.
First, you must use the right size an shape sanding tool for a given job,
different shapes require different tool, boards, blocks, tubes, long and
short as needed, Many builders don't realize (or disregard) the importance
of the right sanding tools. Trying to sand with a chunk of triple folded
sandpaper pushed along with bear hand is not going to work too well. You
will find it a great paradox if you visit somebody's workshop who claims
spending hundreds of hours on finish sanding his airplane and yet you won't
be able to find a decent sanding board in his shop. Make yourself two basic
sanding boards 2,3/4 inch wide 16 and 32 inches long, for the length of one
and two strips of sandpaper. I think the best is to use that white shelving
material. You need to attach an 1 ¼ x 1 ¼ aluminum square tube or a "C"
channel to the back side of it with some screws, that will keep it straight
and also gives you a good grip so you can hold on to it. The 32 inch one
will be used on the wings, 16 inch on the tail, control surfaces and flat
parts of the fuselage. For compound surfaces you will need to make flexible
sanding boards. Not many people know this as I have never seen it mentioned
anywhere but it will make you work a lot easier when the sanding board bends
under the pressure and follows the curve of the surface. You will need two
boards, one should flex rather easy for highly curved surfaces and one
should be fairly stiff for mild curves. The 16 inches length of these
flexible boards should be enough . Use thin plywood, Plexiglas, or whatever
works for you. Get the real sandpaper from auto paint supply store, the one
that comes in 16 inch long strips, they usually carry the best, the 3M brand
is pretty sure bet. The sandpaper grades needed are 36, 80 and 100. Glue it
on with 3M Super 77 spray adhesive (Home depot), spray on only a light coat
of it, that stuff sticks like hell. To remove the worn out paper, heat it up
with a heat gun, it will peel right off.
On tube shape sanding tools the strips will not work, for those, get the big
sheets for floor sanding from Home depot.
The second aspects of the sanding technique is the proper sanding pattern.
For an airfoil shape surface, hold the sanding board parallel (at all times)
to the span and sand at 45 degrees angle, use the longest (reasonable)
stroke, across the whole cord if possible. Start at the root end leading
edge side and move slowly to the tip end with each stroke moved about an
inch or two, creating a sort of a tall tight zigzag pattern. When you get to
the tip, go back to the root and start another pass, this time sanding at 45
degrees the other way - 90 degrees to the first pass. After these two passes
move yourself to the trailing edge side and make two passes from there,
again starting the first pass at 90 degrees to the previous one, and then
keep repeating this cycle. It is this sanding pattern, that will level out
the highs and lows into a nice even flowing plain and create the desired
wave free surface.
The third aspect is you checking the surface frequently for high areas and
directing more attention to them. The best way to check the trueness of the
surface is to feel it by sliding your hand over the surface in long sweeps
in all different directions. If you have never tried this you will be amazed
to find out how sensitive your hand is to even minute surface waves and
unevenness. Direct more sanding to the identified high areas and pass
quicker over the low ones to speed up the process. If everything goes right,
you will have good straight surface just before you remove all the filler
and the high spots of the skin start showing through the filler. Keep
sanding off the excess filler until the highs start to show up as dark spots
across the whole surface. At this point you need to change the sandpaper
grade to 80 for the final sanding stage so you can remove the deep scratches
left by the 36 grade. Do the final once-over with a 100 grade and that's as
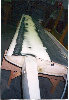
fine as you need to go on this. They say a picture is worth a thousand
words. Luckily I have some good ones to show you what it should look like at
this point. On the picture below the right wing has just been filled and is
curing while I'm sanding the left one
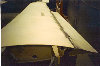
This is a close up of the filed right wing
Here the left wing is sanded and the right wing is just getting started.
Its hard to take a picture of an all white surface, it tends to get
overexposed and the details are lost but looking at the pattern of the dark
spots will give you pretty good idea what it should look like.
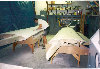
This is the horizontal stabilizer just at the point when the shaping is done
and when I switch to finer grade paper. You can see the cross hatch sanding
pattern there. The dark spots will get quite a bit darker by the time all
deep scratches are gone.
It should take about 4 hours to sand one wing panel to shape on a small
two-seater, up to about 8 hours on a big four-seater.
Compound curved surfaces are a little harder to do. Keep basically the same
crisscross 45 degree pattern relative to the direction of the milder curve
with your flexible sanding board, but pay a lot more attention to "feeling"
the surface and sanding off the highs. By the time you do all your flying
surfaces you will be pretty good at it.
Detailing
There are three kinds of details we have on the plane to deal with, fillets
where components come together and meet at different angles, fitting of
access and inspection panels and uniform control surfaces gaps.
Take a note here, if you decide to do the control surfaces gaps, you need to
do them Before the general surface filling of the control surfaces, that way
the filler is brought up to and blended to the level required to close the
gaps at the nose area of that control surface.
Filets are fairly easy, shape a corner of a plastic squeegee to the desired
radius and use that to shape the applied micro into the fillet radius . Run
the squeegee back and forth in alternating directions very flat at first to
evenly distribute the micro, then start standing it up with each pass to
gradually remove the excess micro and arrive to the final radius. Use the
tube sanding tool that closely matches the radius to sand it smooth.
Inspection panels . In order to have good looking access and inspection
panels, or any other openings like gear doors and baggage compartments doors
or even an engine cowling if its fitted flush with the fuselage, you need to
create a small even gap around them. Here is the trick how to do that. Fist
make sure the covers are exact size and shape, round off the corners, square
corners dont look right. Apply clear package sealing tape to the backside
and wherever needed as a release and mount the covers into exact position.
Now squeegee the micro all around the recess, or over the whole cover if the
height of it is not even, and then run a mixing stick all around the cover
tight against the edge to create a nice line around it. Cutting down the
width of the mixing stick will help it to go around the corners without
widening the gap and dipping the mixing stick in lacquer thinner will
prevent micro from sticking to the stick and help to keep the line edges
nice and smooth.
Control surfaces gaps Ever heard about those incredible even Quarter
thickness gaps that dont change a bit, even when you move the surface ?
Here is how to make them. Apply several plies of duck tape on the underside
of the trailing edge to build up the desired gap thickness. Put clear
packaging tape over it (its slicker and slides better), you will probably be
able to handle only one side at the time. Apply plenty of micro to the nose
of the control surface to fill the intended gap and then some. Cover the
micro with a plastic sheet, using thicker stiffer kind on this works better,
install the control surface into its hinges and slowly move it up and down
through the whole travel so that the excess micro is pushed out. Viola,
after the duck tape build up is removed, you have a beautiful small and even
gap through the whole control surface travel. Before you start removing the
excess micro that got pushed off mark the ends of the travel with a good
line as reference so you dont lose it and sand into it later. before
filling the rest of the surface, cover the finished gap part with the duck
tape to preserve it.
This concludes the first stage, the surface shaping.
Surface finishing
is the second stage of the work when we remove all the nicks, pits, tears
and finally the scratches. First, vacuum the surface, you need to get all
the sanding dust out of the nicks so you can see them and fill them. Micro
does not work on small nicks, it has too coarse consistency. You can use the
Superfil which is much smoother or you can mix your own filler by adding
cab-o-sil along with microbaloons. To mix this filler, get a coffee can,
fill it 1/3 with microbaloons first, then 1/3 Cab-o-sil. Leave the last
third empty so you can mix it well and add more of either substance if you
want to adjust the ratio, throw some wood blocks in to help mixing it, put
the lid on and mix it well. Fill the nicks with a small one inch metal
spatula. Squeegee the filler on to fill the nick but scrape all the excess
from the surface, it would be very hard to sand. That way you will do only
light sanding over those spots to remove the leftover fuzz. To get the right
perspective what size of the nicks is big enough to fill and which is too
small to be bothered with, use the rule, if you can see it from two feet
away, fill it. Another way to look at it if the nick is no deeper then a
scratch left by a 36 grid sandpaper.
Pinholes
These are tiny voids, bubbles and pits caused by air mixed into the filler.
They are invisible until the minute you start spraying the first coat of
primer. They can give you a big headache if you attack them the wrong way.
You might have heard horror stories of builders spraying coat after coat of
primer trying to get rid of them. The bottom line is, you cannot fill the
pinholes by spraying. Yes, if you keep spraying long enough, eventually they
will disappear, but they will not be filled, they will be bridged. Bridged
pinholes can cause the painted surface to develop little pimple like bumps
on the sun when the paint softens some and the trapped air expands with the
heat.
Luckily, we have a simple effective way how to deal with pinholes before we
even see any. Vacuum the surface real well to remove any dust and then
squeegee pure epoxy resin over the surface. The coat is very thin and the
amount of resin is mall, you are basically just wetting the surface, give it
some time to soak in and squeegee off all the excess. The resin has very low
surface tension so it flows into all those small voids and because unlike
primers it doesnt contain any volatiles it doesnt shrink as it cures so
the fill is complete. The second benefit of this step is that the resins
hardens the top shell of the micro, making it more durable.
A word of caution, many epoxy resins do not cure well and stay gummy at very
thin coat, especially in humid condition. If yours is one of those or you
are not sure, use the West system epoxy for this.
When this top coat is cured sand it lightly with 100 just to break the
gloss, and you are ready for the primer.
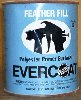
The primer used in this step is a "high build up" kind, intended for final
wet sanding. There are many on the market so I cant say you must use this ,
or cannot use that, except maybe for one. You may have seen reference in
other articles (especially the older ones) to use "Feather fill". I have
used it and I dont understand how anybody can recommend it . This is one of
the worst products I have seen in my life.
I have been using two kinds of primers so far.
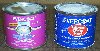
One is "PPG K200" this is acrylic urethane (two part 4:1), very fast drying,
easy to spray, dark yellow in color. Available from auto paint supply
stores. It wet sands very easy, however it has rather soft properties even
when cured. Mishandling of parts can dent and scratch the surface rather
easily.
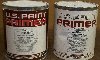
The other kind is epoxy based "US Paint D9002 base /D3002 converter" (Two
part 1:1). Also dark yellow, available from marine supply stores (
www.uspaint.com ) This primer takes longer to dry and its a bit harder to
sand but it is very hard and durable when fully cured. I myself prefer the
better durability, even if it takes more work.
I have not had a chance to try "Poly-fiber Smooth Prime" but I plan on it.
Wet sanding is done by still keeping the same 45 degrees crisscross pattern
but the sanding blocks are a lot smaller, 11x3 inches for large parts 5.5x3
for the smaller ones. I use pieces of hard foam as sanding blocks. Use the
same "super 77 spray adhesive" and spray just very light mist on it to
attach it, it will peel off without the need of heating it up. Start with
180 grade for fast progress but be aware 180 leaves pretty deep scratches
that would show in the paint so switch to 220 grade for the second half of
the job. On the contrary to some peoples believe, 1 sheet of wet sandpaper
does not last forever, it just isnt as obvious its getting dull by looking
at it so change the paper often.
To check the progression and quality of the surface use the squeegee
technique. Pour some water over the surface and squeegee it off with a
rubber window squeegee (Home depot has those), all the remaining pits will
become instantly visible. Keep sanding and checking until they are all gone.
Dont go crazy if you have a few deeper nicks left here and there, and dont
sand flat spots or dips into your surface in order to get rid of them. They
will be filled instead.
For this last filling use polyester based "glazing putty" (auto paint
supplies) This is very smooth creamy filler designed for minor
imperfections. Before you start filling go over the whole surface carefully
and mark all imperfections to be filled with a pencil so you dont have too
look for them while your mixed putty is curing. Mix the glazing filler in
small batches, it has very short pot life so you have only a few minutes on
each batch. Squeegee it on with a small metal spatula and scrape off any
excess. Wet sand the spots after they cure and you are done.
There will be one more coat of primer but that is as a part of painting
| | - The Matronics Europa-List Email Forum - | | | Use the List Feature Navigator to browse the many List utilities available such as the Email Subscriptions page, Archive Search & Download, 7-Day Browse, Chat, FAQ, Photoshare, and much more:
http://www.matronics.com/Navigator?Europa-List |
|
|
|
| Back to top |
|
 |
jrgowing(at)bigpond.net.a
Guest
|
| Posted: Thu Sep 18, 2008 2:33 pm Post subject: Finishing tips |
|
|
Jerry


 Still on the filling but I  have thought the article excellent as well, often turning  back to re-read parts.

 but the hardest part at first was :-


  2The right way  to do it is to fill all of the surface (meaning like one side of a wing or a  fuselage) at once with a coat of filler sufficiently thick enough to fully fill  all the lows, then sand the whole surface as one uniform plain ONCE, without the  need of refilling again. 2


 Strimmer lines as advocated by Graham Singleton  help. I used them and a 2 2 pipe as a roller with thin plastic sheet between  filler and roller as advocated by Kingsley Hurst.


 JR (Bob) Gowing UK Kit 327 in Oz

 [quote]   ---
| | - The Matronics Europa-List Email Forum - | | | Use the List Feature Navigator to browse the many List utilities available such as the Email Subscriptions page, Archive Search & Download, 7-Day Browse, Chat, FAQ, Photoshare, and much more:
http://www.matronics.com/Navigator?Europa-List |
|
| Description: |
|
| Filesize: |
2.78 KB |
| Viewed: |
7057 Time(s) |

|
| Description: |
|
| Filesize: |
52.32 KB |
| Viewed: |
502 Time(s) |
|
| Description: |
|
| Filesize: |
67.88 KB |
| Viewed: |
509 Time(s) |
|
| Description: |
|
| Filesize: |
46.83 KB |
| Viewed: |
488 Time(s) |
|
| Description: |
|
| Filesize: |
44.61 KB |
| Viewed: |
463 Time(s) |
|
| Description: |
|
| Filesize: |
46.51 KB |
| Viewed: |
502 Time(s) |
|
| Description: |
|
| Filesize: |
19.33 KB |
| Viewed: |
491 Time(s) |
|
| Description: |
|
| Filesize: |
89.27 KB |
| Viewed: |
529 Time(s) |
|
| Description: |
|
| Filesize: |
71.24 KB |
| Viewed: |
493 Time(s) |
|
|
|
| Back to top |
|
|
jan_de_jong(at)casema.nl
Guest
|
| Posted: Thu Sep 18, 2008 4:53 pm Post subject: Finishing tips |
|
|
I found that a dry mix of Expancel and SP106 works well for the first

round. Apply liberally, sand once - with coarse boards (I tried the

mucking about technique too and it takes forever). Careful towards the

end, but easy to see.

Less dry mix for surface perfecting. Stlll no point in getting too fine.

SP106 also works for pinhole filling.

Ampreg20 is not very good for surface work - it remains sticky a long

time. The Aeropoxy laminating epoxy may be better - don't know.

Final layer before paint SP Hibuild312 rolled on (ventilate well). Will

mostly be sanded off using fine paper. Outcome to be seen, looks good.

By the way, in my experience the XS wings need filler in parts (trailing

outer wing sections) and hibuild all over or the ribs will be visible.

Jan de Jong


JR Gowing wrote:

[quote] Jerry

 Still on the filling but I have thought the article excellent as well,

 often turning back to re-read parts.

 but the hardest part at first was :-

 "The right way to do it is to fill all of the surface (meaning like

 one side of a wing or a fuselage) at once with a coat of filler

 sufficiently thick enough to fully fill all the lows, then sand the

 whole surface as one uniform plain ONCE, without the need of refilling

 again."

 Strimmer lines as advocated by Graham Singleton help. I used them and

 a 2" pipe as a roller with thin plastic sheet between filler and

 roller as advocated by Kingsley Hurst.

 JR (Bob) Gowing UK Kit 327 in Oz


     ---
| | - The Matronics Europa-List Email Forum - | | | Use the List Feature Navigator to browse the many List utilities available such as the Email Subscriptions page, Archive Search & Download, 7-Day Browse, Chat, FAQ, Photoshare, and much more:
http://www.matronics.com/Navigator?Europa-List |
|
|
|
| Back to top |
|
|
danbish99
Joined: 16 May 2015
Posts: 10
|
| Posted: Sat Mar 25, 2023 6:51 am Post subject: Re: Finishing tips |
|
|
Any idea who wrote this article? Has some excellent tips but I have a few questions for the author. It's posted on the Europa Club site.


Thanks,


Dan
| | - The Matronics Europa-List Email Forum - | | | Use the List Feature Navigator to browse the many List utilities available such as the Email Subscriptions page, Archive Search & Download, 7-Day Browse, Chat, FAQ, Photoshare, and much more:
http://www.matronics.com/Navigator?Europa-List |
|
|
|
| Back to top |
|
|
Hitchflight

Joined: 22 Feb 2018
Posts: 94
Location: Derbyshire, England
|
| Posted: Sun Mar 26, 2023 9:59 am Post subject: Re: Finishing tips |
|
|
Hi Dan
After some digging I have refreshed the page you referred to so as to recognise and credit the probable authors.
Attribution: Thanks to George Sychrovsky & the late Nigel Graham
Hope this helps.
We are most fortunate that many good people have donated their achievements in life to posterity.
Have a contact reference that I will email to you separately.
Regards
Bob
If anyone spots any errors or omissions on the Europa Club website please advise by email to secretary(at)theeuropaclub.org and we would endeavour to fix.
| danbish99 wrote: | Any idea who wrote this article? Has some excellent tips but I have a few questions for the author. It's posted on the Europa Club site.
Thanks,
Dan |
| | - The Matronics Europa-List Email Forum - | | | Use the List Feature Navigator to browse the many List utilities available such as the Email Subscriptions page, Archive Search & Download, 7-Day Browse, Chat, FAQ, Photoshare, and much more:
http://www.matronics.com/Navigator?Europa-List |
|
|
|
| Back to top |
|
|
dmac7
Joined: 05 Apr 2019
Posts: 61
Location: Canada
|
| Posted: Sun Mar 26, 2023 11:59 am Post subject: Re: Finishing tips |
|
|
Thx Jerry, good write up on finishing. I will try to add a Youtube video on a method used by Cory Bird on his aircraft called " Symmetry " a 2004 Oshkosh Grand champion winner.  He called his finish technique "the epoxy wipe method"

https://www.youtube.com/watch?v=43K1qwoHbnc&t=22s

If the link doesn't work just search Youtube for, epoxy wipe method composite aircraft finishing.
| | - The Matronics Europa-List Email Forum - | | | Use the List Feature Navigator to browse the many List utilities available such as the Email Subscriptions page, Archive Search & Download, 7-Day Browse, Chat, FAQ, Photoshare, and much more:
http://www.matronics.com/Navigator?Europa-List |
|
|
|
| Back to top |
|
|
Kelvin Weston
Joined: 14 Apr 2010
Posts: 90
Location: Hampshire, UK
|
|
| Back to top |
|
|
Kelvin Weston
Joined: 14 Apr 2010
Posts: 90
Location: Hampshire, UK
|
| Posted: Sun Mar 26, 2023 12:29 pm Post subject: Re: Finishing tips |
|
|
Hi Dan


A pdf attached of the "Epoxy Wipe" or "Skim Coating" method extracted from Wayne Hicks Cozy project.


There is also lots of great finishing advice on this forum from Bud Yearly and the late great Nev Eyre.
| | - The Matronics Europa-List Email Forum - | | | Use the List Feature Navigator to browse the many List utilities available such as the Email Subscriptions page, Archive Search & Download, 7-Day Browse, Chat, FAQ, Photoshare, and much more:
http://www.matronics.com/Navigator?Europa-List |
|
| Description: |
|

Download |
| Filename: |
SkimCoating.pdf |
| Filesize: |
118.32 KB |
| Downloaded: |
466 Time(s) |
_________________
Regards
Kelv Weston
Kit 497
kelv@kdweston.co.uk |
|
| Back to top |
|
|
danbish99
Joined: 16 May 2015
Posts: 10
|
| Posted: Mon Mar 27, 2023 7:42 pm Post subject: Re: Finishing tips |
|
|
Thanks everyone for all the great resources - awesome to be able to reach out for help like this. You've surely saved me a ton of time avoiding sand & fill hell!


Best,


Dan
| | - The Matronics Europa-List Email Forum - | | | Use the List Feature Navigator to browse the many List utilities available such as the Email Subscriptions page, Archive Search & Download, 7-Day Browse, Chat, FAQ, Photoshare, and much more:
http://www.matronics.com/Navigator?Europa-List |
|
|
|
| Back to top |
|
|
n7188u
Joined: 15 Nov 2015
Posts: 408
|
| Posted: Tue Mar 28, 2023 8:00 am Post subject: Re: Finishing tips |
|
|
One personal observation regarding finishing:


I thought this process was going to be painful, but actually found it to be not as bad as I thought it would. I honestly did not read the entire procedure posted here but I will briefly say what I did.


1.- Clean and carefully scuff sand the fiberglass or gelcoat.

2.- Using the the fishing line technique, apply a nice think coat of expancell plus West Systems 105. What helped a lot was to use an epoxy pump and a sensitive weight scale to exactly measure the ratio of epoxy and expancell. Keeping the mixture consistent between mixes is key.

3.-  Apply the mix using a dry wall spreader modified with an angle epoxied at the width of the application end. This is also key to keep the spreader from bending and creating a concave surface.

4.- Wait until the applied coat starts to gel, remove the fishing line, fill the groves left by the line.

5.- Using Dura-Block sanding blocks and very coarse sandpaper sand expancell coat until no depressions are observed. Most of the time a single pass of expancell coat was enough. If a few voids are present fix those.

6.- Now the cool part, I used a modified epoxy 2K filling primer made by 5-Star and rolled it on using a small foam roller. Push hard and fill as many pinholes as you can.

7.- Once cured, apply coat of Dry Guide Coat (I used Mirka brand).

8.- Sand this coat until all of the guidecoat is gone. Don't worry if this results in a good part of the 5-Start 2K to be gone.

9.- Spray one heavy coat of SPI (Southern Polyurethanes) white Epoxy primer. Welcome to pinhole land since this primer will make them show like craters in the moon (it's actually called "cratering" by the people that make the prime which is very prone to doing this).

9.- Now, without sanding the epoxy primer but before 7 days after applying it,  use thin 3M polyester glaze to fill every pin hole, one by one. This is tedious but the fantastic quality of the 3M glaze makes the job much easier. The 7 day window is important since the epoxy primer doesn't need to be sanded if the glaze and subsequent 2K is applied within this time frame.

10.- Sand the pinholes. This part is indeed tedious because the polyester putty will stick to the sandpaper. The solution was to use a scrap piece of fiberglass and use it to scrape the glaze of the sandpaper. Use only high quality 3M sanding paper. The cheaper red one seems to work better though and the glaze sticks less.

11.- Spray a heavy coat of SPI grey regular 2K primer.

12.- If any small pinholes show I used red one part lacquer glaze to fill them. Quicker and easier for just a few of them.

13.- Guide coat, sand until the white shows and almost all grey 2K is gone. the guide coat will show the low spots. Here you need to gage what fillers to use to reach perfection. A little more 2K will fill shallow areas but it is a little heavier. Still I used it. Some polyester 2K glaze is also good. I don't think I had anything deep enough to go to expancell. If you do you have to do all the stuff stated above on that area.

14.- Finally, a coat of SPI white epoxy and you can spray the paint (no sanding needed if within 7 days). Or I flew it on primer for 2 years. The stuff still looks like the day it was applied and no issues with bugs or deterioration. The SPI primer is semi gloss so it looks pretty good too.


And I used a forced air respiration system and a dust collector from Harbor Freight. I think it is a must.


I can provide more detail on the sandpaper used, 3M glaze PN, 5 Star modified epoxy primer, SPI stuff but will have to collect the info. I can also put together a few pictures.


I hope I didn't bore anyone with this long post.
| | - The Matronics Europa-List Email Forum - | | | Use the List Feature Navigator to browse the many List utilities available such as the Email Subscriptions page, Archive Search & Download, 7-Day Browse, Chat, FAQ, Photoshare, and much more:
http://www.matronics.com/Navigator?Europa-List |
|
|
|
| Back to top |
|
|
|
|
You cannot post new topics in this forum
You cannot reply to topics in this forum
You cannot edit your posts in this forum
You cannot delete your posts in this forum
You cannot vote in polls in this forum
You cannot attach files in this forum
You can download files in this forum
|
Powered by phpBB © 2001, 2005 phpBB Group
|

