 |
Matronics Email Lists
Web Forum Interface to the Matronics Email Lists
|
| View previous topic :: View next topic |
| Author |
Message |
gregoryf.flyboy(at)comcas
Guest
|
 Posted: Mon Feb 02, 2009 3:08 pm Post subject: Fuel line position exiting the cockpit module Posted: Mon Feb 02, 2009 3:08 pm Post subject: Fuel line position exiting the cockpit module |
 |
|
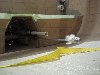
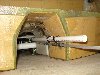
To the Gurus that came earlier:


It seems that the fuel lines exiting the back of the module might come into

contact (or get close) with the flap control tube. Without going through the

hassle of dimensioning the flap system to find out, what do you think is the

best way to handle this?


I could cut the plastic guide-tube at exit, and bend the aluminum fuel

tubing down and to port, or bend both. Will this work? Any other ideas?


BTW, I have a Europa Tri-gear with electric flap positioning.

Thanks for any direction to follow or consider,

Greg Fuchs, A050
| | - The Matronics Europa-List Email Forum - | | | Use the List Feature Navigator to browse the many List utilities available such as the Email Subscriptions page, Archive Search & Download, 7-Day Browse, Chat, FAQ, Photoshare, and much more:
http://www.matronics.com/Navigator?Europa-List |
|
| Description: |
|
| Filesize: |
55.71 KB |
| Viewed: |
295 Time(s) |
|
| Description: |
|
| Filesize: |
65.45 KB |
| Viewed: |
322 Time(s) |
|
|
|
| Back to top |
|
 |
budyerly(at)msn.com
Guest
|
| Posted: Mon Feb 02, 2009 4:26 pm Post subject: Fuel line position exiting the cockpit module |
|
|
<?xml:namespace prefix="v" /><?xml:namespace prefix="o" /><![endif]-->  Wished you would have asked earlier.


 Just wire tie the fuel lines neatly to the floor.  The gear and flap  is normally installed and I fit the baggage bay in before I run the lines.   I jig the fuselage well and don't put on the top until all the work in the rear  is done.  I hate crawling back in the back.  Better to jig the  fuselage properly, ensure it is square.  Then put in the flight control  rods, tail tube, pitch bulkhead, gear, flaps, rudder cables, autopilots, wiring,  antennas, fuel system, batteries and other stuff in the back, then fit the  top.  Makes all those lines and fittings etc. much easier to  de-conflict.  I sheath my rudder cables when I can with 1/4 or 3/16 poly  tube (like on the brakes) to guide them through the saddle area to make sure the  fuel lines, wires, etc. don't interfere.


 Keep it light and simple, PVC can be heavy if you use it a lot.  Those  who put the top on before all the junk is in, have bruises and another 200 hours  of work.


 Just a thought.


 Bud Yerly

 Custom Flight Creations

 [quote]   ---
| | - The Matronics Europa-List Email Forum - | | | Use the List Feature Navigator to browse the many List utilities available such as the Email Subscriptions page, Archive Search & Download, 7-Day Browse, Chat, FAQ, Photoshare, and much more:
http://www.matronics.com/Navigator?Europa-List |
|
|
|
| Back to top |
|
|
gregoryf.flyboy(at)comcas
Guest
|
| Posted: Mon Feb 02, 2009 11:49 pm Post subject: Fuel line position exiting the cockpit module |
|
|
Hi Bud,

Thanks for the response. I used aluminum tubing for the long runs, and high quality, high pressure (Gates) rubber for the tank outputs to tank switch valve, and the one short run from the tank switch valve to the 2 pumps. That is what the thin-walled pvc tubing was for, so that the hose can be easily rethreaded in 5 years (or whenever), and keep it away from the tight-clearance (roll and pitch) controls. I have been considering putting the fuel supply hose on the floor instead, and using the pvc ‘conduit’ for electrical purposes, (especially since it is higher than the fuel lines).  For the aluminum tubing anchor points, I cut short pieces of the 3/8” aluminum tubing, and flared them, to create a base for the araldite/flox that would hold it to the glass, and drilled holes in the other end, to be used for a quality tie-wrap(which uses metal in the locking mechanism, and a short piece of the Gates 3/8” hose used as a rubber standoff. It is a relatively lightweight solution (compared to some), and seems to work well. Of course, since I have gone to the trouble to fabricate stand-offs for the fuel line, I think I will leave the aluminum runs where they are. You are right, it is too late J.


Thanks for the detailed notes on the order of procedure. I had planned to install almost everything before the top went on, too.  It does seem like crawling around the back would be a hateful job. The pitch bulkhead is installed, already. If there is any twist in the tail (I have made measurements, but will be re-verifying again), I am hoping that getting everything true, it will hold that way, after temporarily clecoing the top on. Once done, I should be able to de-cleco, and do the rest of the work. Upon re-clecoing, it should be pulled back into proper position (I hope). My rudder cable will require about another 15 to 20 degrees of change, and I might use UHDMW (Ultra High Density Molecular Weight?) material, with a radius of 2.5” minimum, for the cable to rub on (I have heard it is very slick), or another pulley. This would keep the rudder cable lower in the module, and free up the space higher up, but I am going to leave it for later, to find the optimum position based on where the engine cage and any other possible items will affect the routing.  If all this does not work, my contingency plan is to use similar cable-size sheathed brake cable of the type used for motorcycles. It can be custom made, and no worries about anything being rubbed on this way, and the weight is not much more, in my estimation, especially if it is used just to get through the controls and the fuel tank. But that probably will not happen. The first solutions will most likely work just fine.


Questions: When you talk about “jigging” the fuselage, what are you thinking about? Clecoing on the top fuselage, and getting everything lined up could be considered a type of jig, or are you thinking of a tail-twister (torquer) as a jig, to correct for any potential twist in the tail? I am using about 6 old shelf planks, with cutouts that simulate the shape of the bottom of the fuselage, to support it along the bottom, with 3 castoring wheels, to roll it around with ease. Maybe this is the type of jig you speak of???


By the way, if anyone (or you too, Bud) could let me know if the aluminum line and tube look like they might hit the flap tube (my question is still outstanding), let me know. I am just trying to get a ‘feel’ for their exit out the back of the module, and I think I can modify the odds of them being a problem, by bending  or repositioning them now(while I easily can), before the module gets stuck down. I am feeling too lazy to get out all of the flap parts, position them, and finding out for myself. It is also made a bit more difficult, since the hinge line is below the lower fuselage wall. It is a little hard to judge with the 2D picture, and if that is the case, then I understand. I will find a way to forge ahead…


Regards, and thanks to all,

Greg


From: owner-europa-list-server(at)matronics.com [mailto:owner-europa-list-server(at)matronics.com] On Behalf Of ALAN YERLY

 Sent: Monday, February 02, 2009 4:23 PM

 To: europa-list(at)matronics.com

 Subject: Re: Fuel line position exiting the cockpit module


Wished you would have asked earlier.


Just wire tie the fuel lines neatly to the floor.  The gear and flap is normally installed and I fit the baggage bay in before I run the lines.  I jig the fuselage well and don't put on the top until all the work in the rear is done.  I hate crawling back in the back.  Better to jig the fuselage properly, ensure it is square.  Then put in the flight control rods, tail tube, pitch bulkhead, gear, flaps, rudder cables, autopilots, wiring, antennas, fuel system, batteries and other stuff in the back, then fit the top.  Makes all those lines and fittings etc. much easier to de-conflict.  I sheath my rudder cables when I can with 1/4 or 3/16 poly tube (like on the brakes) to guide them through the saddle area to make sure the fuel lines, wires, etc. don't interfere.


Keep it light and simple, PVC can be heavy if you use it a lot.  Those who put the top on before all the junk is in, have bruises and another 200 hours of work.


Just a thought.


Bud Yerly


Custom Flight Creations

  [quote]

---
| | - The Matronics Europa-List Email Forum - | | | Use the List Feature Navigator to browse the many List utilities available such as the Email Subscriptions page, Archive Search & Download, 7-Day Browse, Chat, FAQ, Photoshare, and much more:
http://www.matronics.com/Navigator?Europa-List |
|
|
|
| Back to top |
|
|
grahamsingleton(at)btinte
Guest
|
| Posted: Tue Feb 03, 2009 3:48 am Post subject: Fuel line position exiting the cockpit module |
|
|
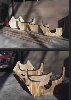
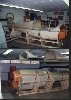
Greg Fuchs wrote:
| Quote: |
Questions: When you talk about jigging the fuselage, what are you
thinking about? Clecoing on the top fuselage, and getting everything
lined up could be considered a type of jig, or are you thinking of a
tail-twister (torquer) as a jig, to correct for any potential twist in
the tail? I am using about 6 old shelf planks, with cutouts that
simulate the shape of the bottom of the fuselage, to support it along
the bottom, with 3 castoring wheels, to roll it around with ease.
Maybe this is the type of jig you speak of???
Greg
|
look at Chuck Popenhoe's jig. You will want to turn the fuse on it's
side at times. Easy with this one
| | - The Matronics Europa-List Email Forum - | | | Use the List Feature Navigator to browse the many List utilities available such as the Email Subscriptions page, Archive Search & Download, 7-Day Browse, Chat, FAQ, Photoshare, and much more:
http://www.matronics.com/Navigator?Europa-List |
|
| Description: |
|
| Filesize: |
25.93 KB |
| Viewed: |
309 Time(s) |
|
| Description: |
|
| Filesize: |
27.45 KB |
| Viewed: |
331 Time(s) |
|
|
|
| Back to top |
|
|
topglock(at)cox.net
Guest
|
| Posted: Tue Feb 03, 2009 6:44 am Post subject: Fuel line position exiting the cockpit module |
|
|
Bud,


Pretty much how I plumbed Baby Blue.  Nail it to the floor...


Jeff - Baby Blue

Pushing 500 hrs


ALAN YERLY wrote:

[quote] Wished you would have asked earlier.


 Just wire tie the fuel lines neatly to the floor.  The gear and flap is

 normally installed and I fit the baggage bay in before I run the lines.

 I jig the fuselage well and don't put on the top until all the work in

 the rear is done.  I hate crawling back in the back.  Better to jig the

 fuselage properly, ensure it is square.  Then put in the flight control

 rods, tail tube, pitch bulkhead, gear, flaps, rudder cables, autopilots,

 wiring, antennas, fuel system, batteries and other stuff in the back,

 then fit the top.  Makes all those lines and fittings etc. much easier

 to de-conflict.  I sheath my rudder cables when I can with 1/4 or 3/16

 poly tube (like on the brakes) to guide them through the saddle area to

 make sure the fuel lines, wires, etc. don't interfere.


 Keep it light and simple, PVC can be heavy if you use it a lot.  Those

 who put the top on before all the junk is in, have bruises and another

 200 hours of work.


 Just a thought.


 Bud Yerly

 Custom Flight Creations


     ---
| | - The Matronics Europa-List Email Forum - | | | Use the List Feature Navigator to browse the many List utilities available such as the Email Subscriptions page, Archive Search & Download, 7-Day Browse, Chat, FAQ, Photoshare, and much more:
http://www.matronics.com/Navigator?Europa-List |
|
|
|
| Back to top |
|
|
budyerly(at)msn.com
Guest
|
| Posted: Tue Feb 03, 2009 6:47 am Post subject: Fuel line position exiting the cockpit module |
|
|
<?xml:namespace prefix="v" /><?xml:namespace prefix="o" /><![endif]-->  Greg,

 The flap tube conflict appears to be just about where your PVC comes  out.  Don't fear putting wiring on the floor with the other lines.  I  never use metal fuel lines as it is too much time.  OK if you have  it.  Don't get too carried away about what sleeve material is best for your  rudder cables, Nylaflow or Nyloseal sold through A/C Spruce is great.


 As far as jigging, first, I have a lot of room in my shop for jigging  a plane for a couple of weeks.  What you described is exactly  what can be used.  For a Tri-gear jigging the aircraft can be nothing more  than a flat table (set the table height at about 20 inches so you can get the  gear on) or use one of the on line ideas you have seen before, and secure it to  the floor with the fuselage bottom secured to support the center of the  module.  I have a steel frame but wood will do.  Ensure the wing  pins are level, and secure the center cockpit section to the table.  A  simple tail support of ply will keep the tail from sagging.  Use a string  to make sure the bottom canoe is not sagging. Do your best at installing  the rear bulkhead and tail torque tube square and level.  I use a 1x4  with a 1.5 inch half moon cut in it to ease one end or both ends of  the torque tube dead level if you suspect your canoe is warped, and recheck  it is square with the wing bolts.  I also mark the floor with the  centerline to aid in the install of the gear.  Always remember to  look ahead to ensure the cross tie bar is clear in the rear when installing the  gear.  I shim and bond the gear alignment angle to the floor and  square the gear and install it.  Then rig the wings and install the cross  member.  (Many tri-gears were put on the gear first, then the wings  rigged.  Level the aircraft with steel tubes stuck in the end of the axel  and secure on blocks bondoed to the floor or if you are careful chock the wheels  and use wing jigs to ensure the wings are straight...)


 Once the gear are good, pull them out if you want and the jig and rig the  flaps. Then back to the tail to finish up that and get the top  fitted.  Fit the top and align the tail to vertical.  That needs  a plumb bob hung over the tail post sighted down the corner made in the  back of the tail post and finish clecoing the top.  You could put the  plane on its gear now and roll it around, plus make your lower access hole at  this time... Take it apart and finish the inside of the  canoe.    Your careful jig alignment early on will almost  guarantee it will stay where it should.  Maybe a little stick under the  torque tube and a small amount of pressure will be necessary to get it all  perfect on final gluing, but it will work.


 The reason the book calls for the top to be put on is less time is loss in  jigging the plane.  The top jigs it reasonably straight.  But it's a  pain in the chest, back, head and elbows.  If your space is limited, and  you must move the plane so the wife can get the car in for work on Monday, then  following the procedure above means resetting your jig.  That's time  consuming.  If your jig is on rollers, mark the floor or make bondo dimples  to hold the wheels or some bolt heads that screw down marks on the floor to  reset the jig for weekend work.


 Gotta go to work,


 Bud


 [quote]   ---
| | - The Matronics Europa-List Email Forum - | | | Use the List Feature Navigator to browse the many List utilities available such as the Email Subscriptions page, Archive Search & Download, 7-Day Browse, Chat, FAQ, Photoshare, and much more:
http://www.matronics.com/Navigator?Europa-List |
|
|
|
| Back to top |
|
|
gregoryf.flyboy(at)comcas
Guest
|
| Posted: Tue Feb 03, 2009 4:42 pm Post subject: Fuel line position exiting the cockpit module |
|
|
Bud-


OK, I  looked at a few pictures, and it does appear to conflict at the area of the pvc, but it appears to do so a certain ways out (rearward), and not at the rear of the module. I should then be able to heat and bend it down out of the way. Failing that, I will cut it at the module exit, and bend the hose in some proper way. The aluminum tube should be fine, but I will bend it down too while it is still accessible (down always appears to be the way to move them, based on responses). I can confirm the time that metal fuel lines take. I just wanted to have something that lasted forever in the lesser accessible parts of the module. After flying the completed Europa for awhile and if ever wanting to build another, I probably would build MUCH faster, and skip the aluminum hassle (or maybe not……knowing me  -ARGH!!). Thanks for the notice on tail sag. I will need to keep an eye out for that. Some of your order of procedures I have not gotten to yet, to think about, so will take them to heart.


I might still “nail” the hose to the bottom, and use the pvc as electrical conduit. It is very enticing. Also, my cradle should work fine for support through the gear project. With strapping, it should support certain angles (not too large) of tipping.  Chuck Popenoe’s cradle appears to support the fuselage quite well. If I had my hands on the dimensions of his rig before I built mine, that would have been a good route to go.


Thanks to all for your help, I think that my problem is safely answered.


Greg


From: owner-europa-list-server(at)matronics.com [mailto:owner-europa-list-server(at)matronics.com] On Behalf Of ALAN YERLY

 Sent: Tuesday, February 03, 2009 6:41 AM

 To: europa-list(at)matronics.com

 Subject: Re: Fuel line position exiting the cockpit module


Greg,


The flap tube conflict appears to be just about where your PVC comes out.  Don't fear putting wiring on the floor with the other lines.  I never use metal fuel lines as it is too much time.  OK if you have it.  Don't get too carried away about what sleeve material is best for your rudder cables, Nylaflow or Nyloseal sold through A/C Spruce is great.


As far as jigging, first, I have a lot of room in my shop for jigging a plane for a couple of weeks.  What you described is exactly what can be used.  For a Tri-gear jigging the aircraft can be nothing more than a flat table (set the table height at about 20 inches so you can get the gear on) or use one of the on line ideas you have seen before, and secure it to the floor with the fuselage bottom secured to support the center of the module.  I have a steel frame but wood will do.  Ensure the wing pins are level, and secure the center cockpit section to the table.  A simple tail support of ply will keep the tail from sagging.  Use a string to make sure the bottom canoe is not sagging. Do your best at installing the rear bulkhead and tail torque tube square and level.  I use a 1x4 with a 1.5 inch half moon cut in it to ease one end or both ends of the torque tube dead level if you suspect your canoe is warped, and recheck it is square with the wing bolts.  I also mark the floor with the centerline to aid in the install of the gear.  Always remember to look ahead to ensure the cross tie bar is clear in the rear when installing the gear.  I shim and bond the gear alignment angle to the floor and square the gear and install it.  Then rig the wings and install the cross member.  (Many tri-gears were put on the gear first, then the wings rigged.  Level the aircraft with steel tubes stuck in the end of the axel and secure on blocks bondoed to the floor or if you are careful chock the wheels and use wing jigs to ensure the wings are straight...)


Once the gear are good, pull them out if you want and the jig and rig the flaps. Then back to the tail to finish up that and get the top fitted.  Fit the top and align the tail to vertical.  That needs a plumb bob hung over the tail post sighted down the corner made in the back of the tail post and finish clecoing the top.  You could put the plane on its gear now and roll it around, plus make your lower access hole at this time... Take it apart and finish the inside of the canoe.    Your careful jig alignment early on will almost guarantee it will stay where it should.  Maybe a little stick under the torque tube and a small amount of pressure will be necessary to get it all perfect on final gluing, but it will work.


The reason the book calls for the top to be put on is less time is loss in jigging the plane.  The top jigs it reasonably straight.  But it's a pain in the chest, back, head and elbows.  If your space is limited, and you must move the plane so the wife can get the car in for work on Monday, then following the procedure above means resetting your jig.  That's time consuming.  If your jig is on rollers, mark the floor or make bondo dimples to hold the wheels or some bolt heads that screw down marks on the floor to reset the jig for weekend work.


Gotta go to work,


Bud


  [quote]

---
| | - The Matronics Europa-List Email Forum - | | | Use the List Feature Navigator to browse the many List utilities available such as the Email Subscriptions page, Archive Search & Download, 7-Day Browse, Chat, FAQ, Photoshare, and much more:
http://www.matronics.com/Navigator?Europa-List |
|
|
|
| Back to top |
|
|
|
|
You cannot post new topics in this forum
You cannot reply to topics in this forum
You cannot edit your posts in this forum
You cannot delete your posts in this forum
You cannot vote in polls in this forum
You cannot attach files in this forum
You can download files in this forum
|
Powered by phpBB © 2001, 2005 phpBB Group
|

