 |
Matronics Email Lists
Web Forum Interface to the Matronics Email Lists
|
| View previous topic :: View next topic |
| Author |
Message |
patreilly43(at)hotmail.co
Guest
|
 Posted: Mon Nov 17, 2008 8:21 pm Post subject: Mod 3 Rebuild Posted: Mon Nov 17, 2008 8:21 pm Post subject: Mod 3 Rebuild |
 |
|
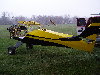
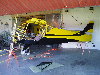
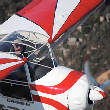
Kitfoxers C Finally learned how to attach pictures. Here's my rebuild project after painting fuselage.


 Pat reilly

 Mod 3 582 Rebuild

 Rockford C IL
| | - The Matronics Kitfox-List Email Forum - | | | Use the List Feature Navigator to browse the many List utilities available such as the Email Subscriptions page, Archive Search & Download, 7-Day Browse, Chat, FAQ, Photoshare, and much more:
http://www.matronics.com/Navigator?Kitfox-List |
|
| Description: |
|
| Filesize: |
856.19 KB |
| Viewed: |
596 Time(s) |
|
| Description: |
|
| Filesize: |
863.27 KB |
| Viewed: |
610 Time(s) |
|
|
|
| Back to top |
|
 |
JetPilot

Joined: 10 Jan 2006
Posts: 1246
|
| Posted: Tue Nov 18, 2008 2:24 am Post subject: Re: Mod 3 Rebuild |
|
|
I like the colors, same colors I am going to use !   Why did you have to rebuild the plane ?


Mike
| | - The Matronics Kitfox-List Email Forum - | | | Use the List Feature Navigator to browse the many List utilities available such as the Email Subscriptions page, Archive Search & Download, 7-Day Browse, Chat, FAQ, Photoshare, and much more:
http://www.matronics.com/Navigator?Kitfox-List |
|
_________________
"NO FEAR" - If you have no fear you did not go as fast as you could have !!!
Kolb MK-III Xtra, 912-S |
|
| Back to top |
|
|
paul(at)eucleides.com
Guest
|
| Posted: Tue Nov 18, 2008 9:44 am Post subject: Mod 3 Rebuild |
|
|
On Mon, November 17, 2008 8:20 pm, patrick reilly wrote:
| Quote: |
Kitfoxers, Finally learned how to attach pictures. Here's my rebuild project after
painting fuselage.
|
Very nice design. I like it!
Looks like it was about to snow in that outside photo, at least you're getting some
streaking that makes it look pretty cold out.
Did you make any mistakes? I'd sure like to hear some points on avoiding problems.
Looks like a lot of masking had to be done. You probably have developed some
techniques. Especially masking in a curved pattern on a plane.
| Quote: |
Pat reilly
Mod 3 582 Rebuild
Rockford, IL
|
--
Paul A. Franz, P.E.
PAF Consulting Engineers
Office 425.440.9505
Cell 425.241.1618
| | - The Matronics Kitfox-List Email Forum - | | | Use the List Feature Navigator to browse the many List utilities available such as the Email Subscriptions page, Archive Search & Download, 7-Day Browse, Chat, FAQ, Photoshare, and much more:
http://www.matronics.com/Navigator?Kitfox-List |
|
|
|
| Back to top |
|
|
Lynn Matteson
Joined: 10 Jan 2006
Posts: 2778
Location: Grass Lake, Michigan
|
| Posted: Tue Nov 18, 2008 10:37 am Post subject: Mod 3 Rebuild |
|
|
When doing curved patterns, I used 1/8" wide plastic tape from an
auto paint supply. They also have it in a thinner, less "curveable"
tape, which won't work as good, but it is better for making straight
lines. Don't pull and therefore stretch the plastic tape, as it will
lift off the surface, especially in a curve. After you've laid the
1/8" tape in the pattern you desire, go back and lay a wider tape
over it, letting the narrower tape be the guide tape for your
pattern, and the wider tape do the job of masking, and holding down
the paper which you also get at the paint store...don't use
newspaper, as it has fine holes which will bleed paint through.
Wherever you tape over a fabric finishing tape, or any other "edge",
be sure to use a fingernail to press down on the tape, otherwise
paint will find its way under the tape, and you'll have little tiny
streaks of paint that you (and others) will see every time you get
close enough to "sniff" the paint job. : )
I did one wing without paying attention to pressing down the tape
real well, and I see the results every time I get up close and
personal with the plane.
If you are not doing very tight curves, you could get away with 3/16"
or maybe 1/4" tapes, but remember that the sharper the curve, the
narrower the tape has to be.
Lynn Matteson
Kitfox IV Speedster, taildragger
Jabiru 2200, 591hrs
Sensenich 62x46
flying again after rebuild, and new Electroair direct-fire ignition
system
On Nov 18, 2008, at 12:44 PM, Paul A. Franz, P.E. wrote:
| Quote: |
<paul(at)eucleides.com>
On Mon, November 17, 2008 8:20 pm, patrick reilly wrote:
>
> Kitfoxers, Finally learned how to attach pictures. Here's my
> rebuild project after
> painting fuselage.
Very nice design. I like it!
Looks like it was about to snow in that outside photo, at least
you're getting some
streaking that makes it look pretty cold out.
Did you make any mistakes? I'd sure like to hear some points on
avoiding problems.
Looks like a lot of masking had to be done. You probably have
developed some
techniques. Especially masking in a curved pattern on a plane.
>
> Pat reilly
> Mod 3 582 Rebuild
> Rockford, IL
--
Paul A. Franz, P.E.
PAF Consulting Engineers
Office 425.440.9505
Cell 425.241.1618
|
| | - The Matronics Kitfox-List Email Forum - | | | Use the List Feature Navigator to browse the many List utilities available such as the Email Subscriptions page, Archive Search & Download, 7-Day Browse, Chat, FAQ, Photoshare, and much more:
http://www.matronics.com/Navigator?Kitfox-List |
|
_________________
Lynn
Kitfox IV-Jabiru 2200
N369LM |
|
| Back to top |
|
|
patreilly43(at)hotmail.co
Guest
|
| Posted: Tue Nov 18, 2008 11:00 am Post subject: Mod 3 Rebuild |
|
|
Paul C Did I make any mistakes! If you paint an airplane or car C you make mistakes. You just hope they are not that noticeable. Masking isn't that hard. It is time consuming but the more you do it the faster it gets. The design I used isn't very complicated. I have painted a couple of cars but it is so infrequent that I am learning again from the beginning and by the time the project is done C I have finally relearned how to paint again. The major mistake I made was not having the right lighting. I used 5(at) 500 watt halogen lights and 2(at) 300 watt incandesant. It would have been much better to have flourescents. If you are going to paint a plane or car C you have to have enough of the right kind of light positioned correctly to always be looking into the glare of the light on the paint. I was finally doing it by the end of the job but because the lighting wasn't optimum I had to do everything but stand on my head to "look into the light". As far as masking C lay a line of narrow enough tape C most of my lines were done with 1/2" masking tape C to allow curveing the line C then site down the line from the end to make sure it curves evenly. Determine reference points to take measurements from C transfer the pattern to the other side. Lay your tape to those lines. Site down the tape and adjust to have even smooth curves like you did on the 1st side.
I painted yellow over a coat of white. Yellow needs white under it or you need many many many coats to cover C red requires the same white under coat. I then taped the pattern for the black and masked the yellow off and shot a coat of yellow along the tape lines. This coat of the base color (yellow) along the tape line is needed to seal the tape so no black seeps under the tape. This results in crisp lines.
I used Poly Fibre system and recommend you get "Poly Fibre How to Cover an Aircraft Using the Poly-Fiber System" book by Jin Goldenbaum. The EAA "How to Paint Your Own Airplane" by Ron Alexander is also a reference book I read an reread. What ever you do follow the directions to the letter for what ever paint system you use. If you think you can short cut or substitue some other product than the one specified C Good Luck! It might cost a little more $ than a less expensive substitute product. But time is also a cost and correcting an error due to non compatabile products is extremely costly C both $ and time.
Oh C yes it was starting to snow when the picture was taken.
Pat Reilly
Mod # 582 Rebuild
Rockford C IL
| Quote: | Date: Tue C 18 Nov 2008 09:44:29 -0800
Subject: Re: Mod 3 Rebuild
From: paul(at)eucleides.com
To: kitfox-list(at)matronics.com
--> Kitfox-List message posted by: "Paul A. Franz C P.E." <paul(at)eucleides.com>
On Mon C November 17 C 2008 8:20 pm C patrick reilly wrote:
>
> Kitfoxers C Finally learned how to attach pictures. Here's my rebuild project after
> painting fuselage.
Very nice design. I like it!
Looks like it was about to snow in that outside photo C at least you're getting some
streaking that makes it look pretty cold out.
Did you make any mistakes? I'd sure like to hear some points on avoiding problems.
Looks like a lot of masking had to be done. You probably have developed some
techniques. Especially masking in a curved pattern on a plane.
>
> Pat reilly
> Mod 3 582 Rebuild
> Rockford C IL
--
Paul A. Franz C P.E.
PAF Consulting Engineers
Office 425.440.9505
========================>
|
[quote][b]
| | - The Matronics Kitfox-List Email Forum - | | | Use the List Feature Navigator to browse the many List utilities available such as the Email Subscriptions page, Archive Search & Download, 7-Day Browse, Chat, FAQ, Photoshare, and much more:
http://www.matronics.com/Navigator?Kitfox-List |
|
|
|
| Back to top |
|
|
patreilly43(at)hotmail.co
Guest
|
| Posted: Tue Nov 18, 2008 11:12 am Post subject: Mod 3 Rebuild |
|
|
Mike C My plane was originally built in 1996 in OK C flew by original builder for 3 years C sold and continued to fly for 3 or so years then was on a trailer which was hit while on the road C tearing out the landing gear. The engine and panel were stripped and sold. The plane was then sold to a fellow in KC area. He stripped the fuselage C replaced one bent tube under seat ready to recpver. He had some physical problems that kept him from finishing the project. I saw it on Barnstormers C bought it C and started looking for a 912 engine C that is what it was originally set up with. I saw a 100 hour 582 FWF in CA that I couldn't pass up. A 912 would have cost 4 times as much and I didn't think a 90mph cruise plane justified the extra cost.
do not archive
Pat Reilly
Mod 3 582 Rebuild
Rockford C IL
[quote][b]
| | - The Matronics Kitfox-List Email Forum - | | | Use the List Feature Navigator to browse the many List utilities available such as the Email Subscriptions page, Archive Search & Download, 7-Day Browse, Chat, FAQ, Photoshare, and much more:
http://www.matronics.com/Navigator?Kitfox-List |
|
|
|
| Back to top |
|
|
patreilly43(at)hotmail.co
Guest
|
| Posted: Tue Nov 18, 2008 11:31 am Post subject: Mod 3 Rebuild |
|
|
Lynn C Most of my curves were gentle enough to use 1/2" paper tape. I had some 3M special plastic tape(expersive). I couldn't get it to stick very well and went back to regular paper masking tape. I could pull and strech the tape to conform to any curve I was making. I did have to go to 1/4" paper tape on the smaller curve on the vert stab. and cowling. Also C shooting the tape line with the base color before shooting the trim color will seal the tape. Any bleed under the tape will be in base color C not visable C and avoid the trim color run under the tape C resulting in crisp lines.
Pat Reilly
Mod 3 582 Rebuild
Rockford C IL
| Quote: | From: lynnmatt(at)jps.net
Subject: Re: Mod 3 Rebuild
Date: Tue C 18 Nov 2008 13:38:11 -0500
To: kitfox-list(at)matronics.com
--> Kitfox-List message posted by: Lynn Matteson <lynnmatt(at)jps.net>
When doing curved patterns C I used 1/8" wide plastic tape from an
auto paint supply. They also have it in a thinner C less "curveable"
tape C which won't work as good C but it is better for making straight
lines. Don't pull and therefore stretch the plastic tape C as it will
lift off the surface C especially in a curve. After you've laid the
1/8" tape in the pattern you desire C go back and lay a wider tape
over it C letting the narrower tape be the guide tape for your
pattern C and the wider tape do the job of masking C and holding down
the paper which you also get at the paint store...don't use
newspaper C as it has fine holes which will bleed paint through.
Wherever you tape over a fabric finishing tape C or any other "edge" C
be sure to use a fingernail to press down on the tape C otherwise
paint will find its way under the tape C and you'll have little tiny
streaks of paint that you (and others) will see every time you get
close enough to "sniff" the paint job. : )
I did one wing without paying attention to pressing down the tape
real well C and I see the results every time I get up close and
personal with the plane.
If you are not doing very tight curves C you could get away with 3/16"
or maybe 1/4" tapes C but remember that the sharper the curve C the
narrower the tape has to be.
Lynn Matteson
Kitfox IV Speedster C taildragger
Jabiru 2200 C 591hrs
Sensenich 62x46
flying again after rebuild C and new Electroair direct-fire ignition
system
On Nov 18 C 2008 C at 12:44 PM C Paul A. Franz C P.E. wrote:
> --> Kitfox-List message posted by: "Paul A. Franz C P.E."
> <paul(at)eucleides.com>
>
>
> On Mon C November 17 C 2008 8:20 pm C patrick reilly wrote:
>>
>> Kitfoxers C Finally learned how to attach pictures. Here's my
>> rebuild project after
>> painting fuselage.
>
> Very nice design. I like it!
>
> Looks like it was about to snow in that outside photo C at least
> you're getting some
> streaking that makes it look pretty cold out.
>
> Did you make any mistakes? I'd sure like to hear some points on
> avoiding problems.
> Looks like a lot of masking had to be done. You probably have
> developed some
> techniques. Especially masking in a curved pattern on a plane.
>
>
>>
>> Pat reilly
>> Mod 3 582 Rebuild
>> Rockford C IL
>
>
> --
> Paul A. Franz C P.E.
> PAF Consulting Engineers
> Office 425.440.9505
> Cell 425.241.1618
>
>==================
|
[quote][b]
| | - The Matronics Kitfox-List Email Forum - | | | Use the List Feature Navigator to browse the many List utilities available such as the Email Subscriptions page, Archive Search & Download, 7-Day Browse, Chat, FAQ, Photoshare, and much more:
http://www.matronics.com/Navigator?Kitfox-List |
|
|
|
| Back to top |
|
|
paul(at)eucleides.com
Guest
|
| Posted: Tue Nov 18, 2008 11:36 am Post subject: Mod 3 Rebuild |
|
|
On Tue, November 18, 2008 10:38 am, Lynn Matteson wrote:
| Quote: |
When doing curved patterns, I used 1/8" wide plastic tape from an
auto paint supply. They also have it in a thinner, less "curveable"
tape, which won't work as good, but it is better for making straight
lines.
|
I don't understand. Why is "thinner" less curveable?
| Quote: | Don't pull and therefore stretch the plastic tape, as it will
lift off the surface, especially in a curve.
|
If you put a section down that isn't quite in the right position, can you adjust it or
do you have to replace the piece that you want to move?
| Quote: | After you've laid the
1/8" tape in the pattern you desire, go back and lay a wider tape
over it, letting the narrower tape be the guide tape for your
pattern, and the wider tape do the job of masking, and holding down
the paper which you also get at the paint store...don't use
newspaper, as it has fine holes which will bleed paint through.
|
I've been using the kind that is folded plastic about 4 inches wide on the roll that
is preattached on one side to the tape. Stick it down, then unfold the plastic to 16"
wide if needed. My problem has been if it don't stick it down perfectly and have to
move it, I get a resulting ragged edge when I peel the masking off.
I haven't been able to get perfect lines at the edges of the masking. I don't know
when to take the masking off either. Should it be done while the new paint is still a
bit soft?
I was told that you have to spray a coat of clear over all the edges to get them real
smooth. I was also told to try to feather the clear. I have tried that and where it is
thin it gets a sort of dry dull look. Maybe I don't understand what "feathering" means
exactly.
| Quote: | Wherever you tape over a fabric finishing tape, or any other "edge",
be sure to use a fingernail to press down on the tape, otherwise
paint will find its way under the tape, and you'll have little tiny
streaks of paint that you (and others) will see every time you get
close enough to "sniff" the paint job. : )
|
Thanks for that tip. I haven't crossed a finishing tape yet with masking. Still
practicing on bare metal.
| Quote: | I did one wing without paying attention to pressing down the tape
real well, and I see the results every time I get up close and
personal with the plane.
If you are not doing very tight curves, you could get away with 3/16"
or maybe 1/4" tapes, but remember that the sharper the curve, the
narrower the tape has to be.
|
How did you lay out long straight lines? Some kind of chalk line? Did you mark the
surface at all as a guide?
When I've asked about how to make the lines really nice looking, I've been frequently
told that if I'm going to be so picky about them, then I need to use vinyl tape. I
don't know if that works over polyfiber though. It also occurred to me that a lot of
really nice pin striping is done on cars and has been done for a long time before
vinyl cutting was available. Also, if the vinyl panels are pretty big then weight
might be a consideration. Maybe I need to hire an experienced car painter to help me
some. I'm learning this on my own without the benefit of an experienced painter so
far.
--
Paul A. Franz, P.E.
PAF Consulting Engineers
Office 425.440.9505
Cell 425.241.1618
| | - The Matronics Kitfox-List Email Forum - | | | Use the List Feature Navigator to browse the many List utilities available such as the Email Subscriptions page, Archive Search & Download, 7-Day Browse, Chat, FAQ, Photoshare, and much more:
http://www.matronics.com/Navigator?Kitfox-List |
|
|
|
| Back to top |
|
|
paul(at)eucleides.com
Guest
|
| Posted: Tue Nov 18, 2008 12:03 pm Post subject: Mod 3 Rebuild |
|
|
On Tue, November 18, 2008 10:58 am, patrick reilly wrote:
| Quote: |
Paul, Did I make any mistakes! If you paint an airplane or car, you make mistakes. You
just hope they are not that noticeable. Masking isn't that hard. It is time consuming
but the more you do it the faster it gets. The design I used isn't very complicated.
|
It sure is impressive looking to me!
| Quote: | I
have painted a couple of cars but it is so infrequent that I am learning again from
the beginning and by the time the project is done, I have finally relearned how to
paint again. The major mistake I made was not having the right lighting. I used 5(at) 500
watt halogen lights and 2(at) 300 watt incandesant. It would have been much better to
have flourescents.
|
All that heat from those lights might have helped though. Is the idea that using
fluorescent lighting is going to mean you don't have to reposition the lights as much?
| Quote: | If you are going to paint a plane or car, you have to have enough
of the right kind of light positioned correctly to always be looking into the glare of
the light on the paint. I was finally doing it by the end of the job but because the
lighting wasn't optimum I had to do everything but stand on my head to "look into the
light".
|
OK, you're making me a believer on that. In my test painting, it's been on a real job
but just not as critical. I have been repairing corrosion damage and blistered paint
on a truck frame and doing a lot of masking of wires, bolt heads, decals and rubber
parts. I have spent many hours with rubber gloves, using various wire brushes and some
powered and naval jelly to remove the rust. Some parts didn't need to be repainted
since there was no damage by blistering under the Imron paint from corrosion. My
mistakes were often due to poor lighting and the other problem was not being able to
position the paint gun the best distance because stuff was in the way. If I
accidentally got a run, I just wiped it all off immediately in the area and shot it
again. Some places I put on too light of a coat simply because the lighting was not
bright enough. I think your trick of sighting into the glare is something I didn't
know and will adopt as standard practice.
| Quote: | As far as masking, lay a line of narrow enough tape, most of my lines were
done with 1/2" masking tape, to allow curveing the line, then site down the line from
the end to make sure it curves evenly. Determine reference points to take measurements
from, transfer the pattern to the other side.
|
what do you make your transfer marks with? Or do you just start the masking as
measured points without a mark?
| Quote: | Lay your tape to those lines. Site down
the tape and adjust to have even smooth curves like you did on the 1st side.
I painted yellow over a coat of white. Yellow needs white under it or you need many
many many coats to cover, red requires the same white under coat. I then taped the
pattern for the black and masked the yellow off and shot a coat of yellow along the
tape lines. This coat of the base color (yellow) along the tape line is needed to seal
the tape so no black seeps under the tape. This results in crisp lines.
|
Oh, I see, that's clever. Do you pull the masking when the paint is still wet? How to
you keep from getting tiny little fracture lines in the paint when you pull the
masking off?
| Quote: | I used Poly Fibre system and recommend you get "Poly Fibre How to Cover an Aircraft
Using the Poly-Fiber System" book by Jin Goldenbaum.
|
I've got that one.
| Quote: | The EAA "How to Paint Your Own
Airplane" by Ron Alexander is also a reference book I read an reread.
|
OK, thanks for that tip. I'll get that one too.
| Quote: | What ever you do
follow the directions to the letter for what ever paint system you use. If you think
you can short cut or substitue some other product than the one specified, Good Luck!
It might cost a little more $ than a less expensive substitute product.
|
Sometimes, I've found that some of the more expensive products are horribly marked up
though. I will pay a little more locally to give them the business for the service I
get though.
| Quote: | But time is
also a cost and correcting an error due to non compatabile products is extremely
costly, both $ and time.
|
I'm a believer in that. I'm using only the polyfiber products on my airplane.
| Quote: | Oh, yes it was starting to snow when the picture was taken.
|
Sure is more fun working on the airplane than doing the yard work and house repairs.
Thanks for the coaching.
--
Paul A. Franz, P.E.
PAF Consulting Engineers
Office 425.440.9505
Cell 425.241.1618
| | - The Matronics Kitfox-List Email Forum - | | | Use the List Feature Navigator to browse the many List utilities available such as the Email Subscriptions page, Archive Search & Download, 7-Day Browse, Chat, FAQ, Photoshare, and much more:
http://www.matronics.com/Navigator?Kitfox-List |
|
|
|
| Back to top |
|
|
akflyer
Joined: 07 May 2007
Posts: 574
Location: Soldotna AK
|
| Posted: Tue Nov 18, 2008 2:45 pm Post subject: Re: Mod 3 Rebuild |
|
|
For doing the straight lines and most masking, I used the blue scotch painters tape, medium hold and used a plastic spreader to make sure the tape was stuck down good along the line to be painted. I taped the actual masking paper to that tape. For curved lines I used 1/4" blue line tape from the auto store. It is spendy but nothing I have used will lay down the way that stuff does. On the fuse and cowling, as soon as I was done spraying, I went to the side I shot first and started pulling the tapes and masking. All lines were crisp and clean.
| | - The Matronics Kitfox-List Email Forum - | | | Use the List Feature Navigator to browse the many List utilities available such as the Email Subscriptions page, Archive Search & Download, 7-Day Browse, Chat, FAQ, Photoshare, and much more:
http://www.matronics.com/Navigator?Kitfox-List |
|
_________________
DO NOT ARCHIVE
Leonard Perry aka SNAKE
Soldotna AK
Avid "C" / Mk IV
582 (147 hrs and counting on the rebuild)
IVO IFA
Full Lotus 1450
#1 snake oil salesman since 1-22-2009
I would rather die trying to live, than to live trying not to die.... |
|
| Back to top |
|
|
gary.algate(at)sandvik.co
Guest
|
| Posted: Tue Nov 18, 2008 2:47 pm Post subject: Mod 3 Rebuild |
|
|
I did the same as you Lynn - the tape I used was 3/16" and is called "Fine line Tape" available from most Autopro shops.


Ended up with really sharp detail and no seepage


Gary


 Gary Algate

 Classic 4 Jab2200


 This e-mail is confidential and it is intended only for the addressees. Any review, dissemination, distribution, or copying of this message by persons or entities other than the intended recipient is prohibited. If you have received this e-mail in error, kindly notify us immediately by telephone or e-mail and delete the message from your system. The sender does not accept liability for any errors or omissions in the contents of this message which may arise as a result of the e-mail transmission.


Lynn Matteson <lynnmatt(at)jps.net>

Sent by: owner-kitfox-list-server(at)matronics.com

19/11/2008 05:15 AM

Please respond to

 kitfox-list(at)matronics.com     To

 kitfox-list(at)matronics.com   cc

    Subject

 Re: Mod 3 Rebuild


--> Kitfox-List message posted by: Lynn Matteson <lynnmatt(at)jps.net>


 When doing curved patterns, I used 1/8" wide plastic tape from an

 auto paint supply. They also have it in a thinner, less "curveable"

 tape, which won't work as good, but it is better for making straight

 lines. Don't pull and therefore stretch the plastic tape, as it will

 lift off the surface, especially in a curve. After you've laid the

 1/8" tape in the pattern you desire, go back and lay a wider tape

 over it, letting the narrower tape be the guide tape for your

 pattern, and the wider tape do the job of masking, and holding down

 the paper which you also get at the paint store...don't use

 newspaper, as it has fine holes which will bleed paint through.

 Wherever you tape over a fabric finishing tape, or any other "edge",

 be sure to use a fingernail to press down on the tape, otherwise

 paint will find its way under the tape, and you'll have little tiny

 streaks of paint that you (and others) will see every time you get

 close enough to "sniff" the paint job. : )

 I did one wing without paying attention to pressing down the tape

 real well, and I see the results every time I get up close and

 personal with the plane.

 If you are not doing very tight curves, you could get away with 3/16"

 or maybe 1/4" tapes, but remember that the sharper the curve, the

 narrower the tape has to be.


 Lynn Matteson

 Kitfox IV Speedster, taildragger

 Jabiru 2200, 591hrs

 Sensenich 62x46

 flying again after rebuild, and new Electroair direct-fire ignition

 system


 On Nov 18, 2008, at 12:44 PM, Paul A. Franz, P.E. wrote:


 > --> Kitfox-List message posted by: "Paul A. Franz, P.E."

 > <paul(at)eucleides.com>

 >

 >

 > On Mon, November 17, 2008 8:20 pm, patrick reilly wrote:

 >>

 >> Kitfoxers, Finally learned how to attach pictures. Here's my

 >> rebuild project after

 >> painting fuselage.

 >

 > Very nice design. I like it!

 >

 > Looks like it was about to snow in that outside photo, at least

 > you're getting some

 > streaking that makes it look pretty cold out.

 >

 > Did you make any mistakes? I'd sure like to hear some points on

 > avoiding problems.

 > Looks like a lot of masking had to be done. You probably have

 > developed some

 > techniques. Especially masking in a curved pattern on a plane.

 >

 >

 >>

 >> Pat reilly

 >> Mod 3 582 Rebuild

 >> Rockford, IL

 >

 >

 > --

 > Paul A. Franz, P.E.

 > PAF Consulting Engineers

 > Office 425.440.9505

 > Cell 425.241.1618

 >

 >

 >

 >


          -Matt Dralle, List Admin.

 -


 [quote][b]
| | - The Matronics Kitfox-List Email Forum - | | | Use the List Feature Navigator to browse the many List utilities available such as the Email Subscriptions page, Archive Search & Download, 7-Day Browse, Chat, FAQ, Photoshare, and much more:
http://www.matronics.com/Navigator?Kitfox-List |
|
|
|
| Back to top |
|
|
Lynn Matteson
Joined: 10 Jan 2006
Posts: 2778
Location: Grass Lake, Michigan
|
| Posted: Tue Nov 18, 2008 3:00 pm Post subject: Mod 3 Rebuild |
|
|
The "thinner" tape I refer to is a light green in color, and is less
curveable because of the makeup of the material....and also I think
it is wider than the vinyl/plastic. This is why it is better to use
it for straight lines...it doesn't give when tugged straight,
therefore it maintains a straight line, unlike the plastic/vinyl tape
which stretches, then when pressed down, will shrink back to its
original length. And if you've used it for a curved line, the curve
naturally gets shorter, and the only way it can do this is to lift
off the surface. I used the blue or red vinyl (sorry for calling it
plastic earlier...I don't have any here at home now or I'd give you
the mfr. name...probably 3M though) on curved lines, and the light
green translucent stuff for straight lines.
I usually lay down a line, make sure that it's in the right position,
then press it down. I have,however, had to move a line on occasion,
and it can be lifted and moved at least once.
I tried the "attached masking" type of stuff you refer to, and didn't
like it much. I didn't like being able to see through it, and also,
the paint didn't stick very well to it, and when pulling off that
material, the stuff flexes enough that the paint that ended up on it
would flake off and land on the freshly-painted surface....not good.
I haven't tried the clear coat over the edge of the masking tape, nor
have I tried the base color over the edge of the masking tape.
If you haven't crossed over a finishing tape yet, you soon will, and
believe me, you're gonna do it a lot. Oh, one thing to be aware
of...if you can do your design such that you don't run along a
finishing tape...pinked tape....edge for very long. You'll see that
the line that you wish to paint will cause you to wear out your
fingernails pressing the tape down over each and every one of those
little pointy edges...unless of course, you do the clear or base
color spraying first. (I wish I had heard of that method when I
sprayed my plane.)
I laid out my long lines by marking on the white base coat, which by
the way is almost a must, at least as far as I can tell. I was told
that to spray the orange color that I used over the Polyspray would
take a lot of paint to cover and look good. Much better to spray the
whole thing white, and then you have a uniform color to spray darker
coats over. Of course, this was told to me by a paint salesman, so
take that advice with a grain of salt. : ) If you're going to paint
it a darker (than the Polyspray) color, I think I'd skip the all-
white base coat...somebody else might have an idea on the wiseness of
this move.
I would never use a vinyl panel on an airplane due to the weight, and
besides, it looks like crap in my not-so-humble opinion...too hard to
make compound curves, I would think. I feel the same way about using
vinyl tape for pin-striping. To me, it shows a bit of less-than-
quality workmanship. I'd rather have my painted-on accent lines come
out a little less than perfect, than have taped accent lines any
day...and so will the judges. Not that I've ever won anything with my
plane...it gets used too much to win prizes. : ) (At least that's my
excuse.)
By all means, go to a body shop and ask questions...those guys are a
wealth of knowledge. I've got a body shop just 275 paces up the road
from me, and they enjoy my coming up and asking questions and
especially dropping off a six-pack as a reward.
Lynn Matteson
Kitfox IV Speedster, taildragger
Jabiru 2200, 591hrs
Sensenich 62x46
flying again after rebuild, and new Electroair direct-fire ignition
system
On Nov 18, 2008, at 2:35 PM, Paul A. Franz, P.E. wrote:
| Quote: |
<paul(at)eucleides.com>
On Tue, November 18, 2008 10:38 am, Lynn Matteson wrote:
>
>
> When doing curved patterns, I used 1/8" wide plastic tape from an
> auto paint supply. They also have it in a thinner, less "curveable"
> tape, which won't work as good, but it is better for making straight
> lines.
I don't understand. Why is "thinner" less curveable?
> Don't pull and therefore stretch the plastic tape, as it will
> lift off the surface, especially in a curve.
If you put a section down that isn't quite in the right position,
can you adjust it or
do you have to replace the piece that you want to move?
> After you've laid the
> 1/8" tape in the pattern you desire, go back and lay a wider tape
> over it, letting the narrower tape be the guide tape for your
> pattern, and the wider tape do the job of masking, and holding down
> the paper which you also get at the paint store...don't use
> newspaper, as it has fine holes which will bleed paint through.
I've been using the kind that is folded plastic about 4 inches wide
on the roll that
is preattached on one side to the tape. Stick it down, then unfold
the plastic to 16"
wide if needed. My problem has been if it don't stick it down
perfectly and have to
move it, I get a resulting ragged edge when I peel the masking off.
I haven't been able to get perfect lines at the edges of the
masking. I don't know
when to take the masking off either. Should it be done while the
new paint is still a
bit soft?
I was told that you have to spray a coat of clear over all the
edges to get them real
smooth. I was also told to try to feather the clear. I have tried
that and where it is
thin it gets a sort of dry dull look. Maybe I don't understand what
"feathering" means
exactly.
> Wherever you tape over a fabric finishing tape, or any other "edge",
> be sure to use a fingernail to press down on the tape, otherwise
> paint will find its way under the tape, and you'll have little tiny
> streaks of paint that you (and others) will see every time you get
> close enough to "sniff" the paint job. : )
Thanks for that tip. I haven't crossed a finishing tape yet with
masking. Still
practicing on bare metal.
> I did one wing without paying attention to pressing down the tape
> real well, and I see the results every time I get up close and
> personal with the plane.
> If you are not doing very tight curves, you could get away with 3/16"
> or maybe 1/4" tapes, but remember that the sharper the curve, the
> narrower the tape has to be.
How did you lay out long straight lines? Some kind of chalk line?
Did you mark the
surface at all as a guide?
When I've asked about how to make the lines really nice looking,
I've been frequently
told that if I'm going to be so picky about them, then I need to
use vinyl tape. I
don't know if that works over polyfiber though. It also occurred to
me that a lot of
really nice pin striping is done on cars and has been done for a
long time before
vinyl cutting was available. Also, if the vinyl panels are pretty
big then weight
might be a consideration. Maybe I need to hire an experienced car
painter to help me
some. I'm learning this on my own without the benefit of an
experienced painter so
far.
--
Paul A. Franz, P.E.
PAF Consulting Engineers
Office 425.440.9505
Cell 425.241.1618
|
| | - The Matronics Kitfox-List Email Forum - | | | Use the List Feature Navigator to browse the many List utilities available such as the Email Subscriptions page, Archive Search & Download, 7-Day Browse, Chat, FAQ, Photoshare, and much more:
http://www.matronics.com/Navigator?Kitfox-List |
|
_________________
Lynn
Kitfox IV-Jabiru 2200
N369LM |
|
| Back to top |
|
|
patreilly43(at)hotmail.co
Guest
|
| Posted: Tue Nov 18, 2008 3:09 pm Post subject: Mod 3 Rebuild |
|
|
Paul C The halogens were hot. Too hot. It was summer and I didn't need extra heat. Halogen lights tend to spot light the light. Flouresents give a flood light light that is better. less heat and much less power to operate. Set them up properly and use enough of them so you don't have to reposition the lights.
Yes C you have to look into the glare on the paint to see how wet it is C how much paint you have or don't have on the surface.
I just used a lead pencil to mark every couple of feet where I wanted my lines. Don't use a marker. It is easier to see but will bleed through the paint.
I pulled the tape before completely dry. That Poly Fibre book tells you when to pull tape.
Build yourself a fresh air system with a shop vac that you can reverse the air flow. I bought a new one for $35 at Farm and Fleet as a clean dedicated air supply unit. Get a Tyvek hood for $35 and coveralls from Cole Parmer on the internet. And run the air in with a garden hose. It was hot and the shop vac heats the air also C so I bought a wash tub C coiled up 20' of swimming pool vac hose in the tub C dumped 20# of ice in the tub and had cool dry air to the hood. Do it even if you are using a non-carcinogenic paint. Mine worked great. You can buy a fresh air system from Hobby Air C but I think they are about $400+.
Good Luck
Pat Reilly
| Quote: | Date: Tue C 18 Nov 2008 12:03:01 -0800
Subject: RE: Mod 3 Rebuild
From: paul(at)eucleides.com
To: kitfox-list(at)matronics.com
--> Kitfox-List message posted by: "Paul A. Franz C P.E." <paul(at)eucleides.com>
On Tue C November 18 C 2008 10:58 am C patrick reilly wrote:
>
> Paul C Did I make any mistakes! If you paint an airplane or car C you make mistakes. You
> just hope they are not that noticeable. Masking isn't that hard. It is time consuming
> but the more you do it the faster it gets. The design I used isn't very complicated.
It sure is impressive looking to me!
> I
> have painted a couple of cars but it is so infrequent that I am learning again from
> the beginning and by the time the project is done C I have finally relearned how to
> paint again. The major mistake I made was not having the right lighting. I used 5(at) 500
> watt halogen lights and 2(at) 300 watt incandesant. It would have been much better to
> have flourescents.
All that heat from those lights might have helped though. Is the idea that using
fluorescent lighting is going to mean you don't have to reposition the lights as much?
> If you are going to paint a plane or car C you have to have enough
> of the right kind of light positioned correctly to always be looking into the glare of
> the light on the paint. I was finally doing it by the end of the job but because the
> lighting wasn't optimum I had to do everything but stand on my head to "look into the
> light".
OK C you're making me a believer on that. In my test painting C it's been on a real job
but just not as critical. I have been repairing corrosion damage and blistered paint
on a truck frame and doing a lot of masking of wires C bolt heads C decals and rubber
parts. I have spent many hours with rubber gloves C using various wire brushes and some
powered and naval jelly to remove the rust. Some parts didn't need to be repainted
since there was no damage by blistering under the Imron paint from corrosion. My
mistakes were often due to poor lighting and the other problem was not being able to
position the paint gun the best distance because stuff was in the way. If I
accidentally got a run C I just wiped it all off immediately in the area and shot it
again. Some places I put on too light of a coat simply because the lighting was not
bright enough. I think your trick of sighting into the glare is something I didn't
know and will adopt as standard practice.
> As far as masking C lay a line of narrow enough tape C most of my lines were
> done with 1/2" masking tape C to allow curveing the line C then site down the line from
> the end to make sure it curves evenly. Determine reference points to take measurements
> from C transfer the pattern to the other side.
what do you make your transfer marks with? Or do you just start the masking as
measured points without a mark?
> Lay your tape to those lines. Site down
> the tape and adjust to have even smooth curves like you did on the 1st side.
> I painted yellow over a coat of white. Yellow needs white under it or you need many
> many many coats to cover C red requires the same white under coat. I then taped the
> pattern for the black and masked the yellow off and shot a coat of yellow along the
> tape lines. This coat of the base color (yellow) along the tape line is needed to seal
> the tape so no black seeps under the tape. This results in crisp lines.
Oh C I see C that's clever. Do you pull the masking when the paint is still wet? How to
you keep from getting tiny little fracture lines in the paint when you pull the
masking off?
> I used Poly Fibre system and recommend you get "Poly Fibre How to Cover an Aircraft
> Using the Poly-Fiber System" book by Jin Goldenbaum.
I've got that one.
> The EAA "How to Paint Your Own
> Airplane" by Ron Alexander is also a reference book I read an reread.
OK C thanks for that tip. I'll get that one too.
> What ever you do
> follow the directions to the letter for what ever paint system you use. If you think
> you can short cut or substitue some other product than the one specified C Good Luck!
> It might cost a little more $ than a less expensive substitute product.
Sometimes C I've found that some of the more expensive products are horribly marked up
though. I will pay a little more locally to give them the business for the service I
get though.
> But time is
> also a cost and correcting an error due to non compatabile products is extremely
> costly C both $ and time.
I'm a believer in that. I'm using only the polyfiber products on my airplane.
> Oh C yes it was starting to snow when the picture was taken.
Sure is more fun working on the airplane than doing the yard work and house repairs.
Thanks for the coaching.
--
Paul A. Franz C P.E.
PAF Consulting Engineers
Office 425.440.9505
>=====================
|
[quote][b]
| | - The Matronics Kitfox-List Email Forum - | | | Use the List Feature Navigator to browse the many List utilities available such as the Email Subscriptions page, Archive Search & Download, 7-Day Browse, Chat, FAQ, Photoshare, and much more:
http://www.matronics.com/Navigator?Kitfox-List |
|
|
|
| Back to top |
|
|
Lynn Matteson
Joined: 10 Jan 2006
Posts: 2778
Location: Grass Lake, Michigan
|
| Posted: Tue Nov 18, 2008 3:33 pm Post subject: Mod 3 Rebuild |
|
|
Looking back at some pics I shot, I might not have used
1/8"....probably 1/4" or even 3/8" judging from the comparison with
my finishing tapes over the false ribs. Man, that was 3 1/2 years
ago! How quickly we forget.
Lynn Matteson
Kitfox IV Speedster, taildragger
Jabiru 2200, 591hrs
Sensenich 62x46
flying again after rebuild, and new Electroair direct-fire ignition
system
On Nov 18, 2008, at 5:47 PM, gary.algate(at)sandvik.com wrote:
| Quote: |
I did the same as you Lynn - the tape I used was 3/16" and is
called "Fine line Tape" available from most Autopro shops.
Ended up with really sharp detail and no seepage
Gary
Gary Algate
Classic 4 Jab2200
> --
|
| | - The Matronics Kitfox-List Email Forum - | | | Use the List Feature Navigator to browse the many List utilities available such as the Email Subscriptions page, Archive Search & Download, 7-Day Browse, Chat, FAQ, Photoshare, and much more:
http://www.matronics.com/Navigator?Kitfox-List |
|
_________________
Lynn
Kitfox IV-Jabiru 2200
N369LM |
|
| Back to top |
|
|
Lynn Matteson
Joined: 10 Jan 2006
Posts: 2778
Location: Grass Lake, Michigan
|
| Posted: Tue Nov 18, 2008 3:45 pm Post subject: Mod 3 Rebuild |
|
|
It seems like I read that the regular masking tape...crepe tape...is
too "wrinkeley" to use for fine edging, although the type of paint
used might have something to do with that...thin, runny paint would
tend to seep under a not-well-pressed-down tape edge.
All this talk of doing a perfect paint job reminds me of an old
photography professor (talking about making very crisp, sharply
focussed prints) who said "are you going to stand back and admire the
picture, or get your nose two inches away and sniff the damn thing?"
Lynn Matteson
Kitfox IV Speedster, taildragger
Jabiru 2200, 591hrs
Sensenich 62x46
flying again after rebuild, and new Electroair direct-fire ignition
system
On Nov 18, 2008, at 2:29 PM, patrick reilly wrote:
| Quote: | Lynn, Most of my curves were gentle enough to use 1/2" paper tape.
I had some 3M special plastic tape(expersive). I couldn't get it to
stick very well and went back to regular paper masking tape. I
could pull and strech the tape to conform to any curve I was
making. I did have to go to 1/4" paper tape on the smaller curve on
the vert stab. and cowling. Also, shooting the tape line with the
base color before shooting the trim color will seal the tape. Any
bleed under the tape will be in base color, not visable, and avoid
the trim color run under the tape, resulting in crisp lines.
Pat Reilly
Mod 3 582 Rebuild
Rockford, IL
|
| | - The Matronics Kitfox-List Email Forum - | | | Use the List Feature Navigator to browse the many List utilities available such as the Email Subscriptions page, Archive Search & Download, 7-Day Browse, Chat, FAQ, Photoshare, and much more:
http://www.matronics.com/Navigator?Kitfox-List |
|
_________________
Lynn
Kitfox IV-Jabiru 2200
N369LM |
|
| Back to top |
|
|
Guy Buchanan
Joined: 16 Jul 2006
Posts: 1204
Location: Ramona, CA
|
| Posted: Tue Nov 18, 2008 4:32 pm Post subject: Mod 3 Rebuild |
|
|
At 03:09 PM 11/18/2008, you wrote:
| Quote: | Paul, The halogens were hot. Too hot. It was summer and I didn't
need extra heat. Halogen lights tend to spot light the light.
Flouresents give a flood light light that is better. less heat and
much less power to operate. Set them up properly and use enough of
them so you don't have to reposition the lights.
|
I suggest hanging 4' flourescents vertically. It works wonders. Don't
paint them, though. 
| Quote: | I just used a lead pencil to mark every couple of feet where I
wanted my lines. Don't use a marker. It is easier to see but will
bleed through the paint.
|
I just had great success doing some straight lines with a
construction laser. It works even over curved surfaces if you orient
the laser correctly. I've also had success getting straight lines on
small curved parts using the sun's shadow off a straight-edge to
locate the line.
Guy Buchanan
San Diego, CA
K-IV 1200 / 582-C / Warp / 100% done, thanks mostly to Bob Ducar.
| | - The Matronics Kitfox-List Email Forum - | | | Use the List Feature Navigator to browse the many List utilities available such as the Email Subscriptions page, Archive Search & Download, 7-Day Browse, Chat, FAQ, Photoshare, and much more:
http://www.matronics.com/Navigator?Kitfox-List |
|
_________________
Guy Buchanan
Deceased K-IV 1200
A glider pilot too. |
|
| Back to top |
|
|
|
|
You cannot post new topics in this forum
You cannot reply to topics in this forum
You cannot edit your posts in this forum
You cannot delete your posts in this forum
You cannot vote in polls in this forum
You cannot attach files in this forum
You can download files in this forum
|
Powered by phpBB © 2001, 2005 phpBB Group
|

