 |
Matronics Email Lists
Web Forum Interface to the Matronics Email Lists
|
| View previous topic :: View next topic |
| Author |
Message |
n4546v(at)mindspring.com
Guest
|
 Posted: Thu Dec 29, 2011 11:21 am Post subject: Cracked Canopy Posted: Thu Dec 29, 2011 11:21 am Post subject: Cracked Canopy |
 |
|
do not archive
| Quote: | In reality it is just as easy, maybe easier, to hack away at Lexan as Plexiglass.
Best regards,
Paul
Camas, WA
I don't agree with that. Here's some more purely generic info.
Regards,
Randy, Las vegas

Discover the expert in you.
What Is Lexan Made Out Of?By Neal Litherland, eHow Contributor
Lexan is a commonly used replacement for glass and even Plexiglas in a variety of areas. Stronger and more resilient, but still providing many benefits of glass, Lexan is used in industry, in communication, and even signage. But the process used to make this material, as well as the definition of what Lexan is and isn't, can sometimes get a little complicated. - Lexan
-
Lexan is a name for a sheet of polycarbonate resin that is generally considered to be a shatterproof material. Though still technically a plastic, Lexan is stronger and more durable than either traditional glass or the plastic Plexiglas, and it is used in situations where extra survivability of the material is considered worth the extra cost, such as "bulletproof" windows in police stations or armored vehicles.
Process -
Lexan is made through a patented chemical process. By reacting a chemical compound called Bisphenol A with carbonyl chloride (also known as phosgene), the base resin that makes up Lexan is produced. While sheets of this resin material can be cut into a variety of lengths, only those which are between .03 inches (or 0.75 mm.) and .48 inches (or 12 mm.) are ever referred to as actually being Lexan.
Development -
Lexan was first developed in the 1950s by General Electric Plastics. Dr. Daniel Fox was attempting to create a new, more durable plastic to be used as a wire coating when he made the discovery in the GE labs. This exact same breakthrough had happened independently in Germany, where a Dr. Herman Schnell of Bayer was equally impressed by the extreme toughness of the new resin material. Though a scramble for patents ensued, GE Plastics became the main manufacturer and distributor of Lexan.
Properties -
Though it is a great deal tougher, Lexan bears a very strong resemblance to Plexiglas, also known as Lucite or Perspex. Lexan often has a shiny, acrylic look though it is a great deal tougher than any acrylic. Lexan will scratch in a manner similar to Plexiglas, however. Throughout a variety of tests, Lexan has been shown to be nearly shatterproof, and to even withstand bullets depending on the size of the weapon and distance the shot was fired from. One of the other properties of Lexan, and one which can be a major health risk, is that the resin may leach bisphenol A. This chemical, which is used in Lexan's manufacturing process, has been linked to cancer by several studies.
Uses -
Given its durability, Lexan has been used in a huge variety of products and industries. Lexan is a favorite of the aerospace industry for making cockpits and windscreens that are used in a variety of aircraft. More commonplace items, such as the original Apple Ipod (which had a white plastic body made of Lexan) also use this shatterproof plastic. Additionally, Lexan is popular in racing, being used for both helmets and windshields to reduce the weight that is active in the vehicle. Also, whether or not fans of the show are aware of it, Lexan is often used on shows such as "Myth Busters" and "Deadliest Warrior," where the clear, protective sheets are used to keep the hosts safe from explosions and flying debris.
|
| | - The Matronics Zenith-List Email Forum - | | | Use the List Feature Navigator to browse the many List utilities available such as the Email Subscriptions page, Archive Search & Download, 7-Day Browse, Chat, FAQ, Photoshare, and much more:
http://www.matronics.com/Navigator?Zenith-List |
|
| Description: |
|
| Filesize: |
4.98 KB |
| Viewed: |
15981 Time(s) |

|
|
|
| Back to top |
|
 |
Scotsman
Joined: 27 Aug 2007
Posts: 89
Location: Johannesburg, South Africa
|
| Posted: Thu Dec 29, 2011 10:32 pm Post subject: Re: Cracked Canopy |
|
|
How have you guys dealt with riveting on the canopy?  The sides of the front and rear canopy would need to be riveted but after my past experiences cracking the canopy I am really reluctant to do anything.


Now having learnt from the thread I will use the recommended drill bit and techniques but I am still worried that the pressure generated by the rivet on the canopy will cause the canopy to crack.


Any recommendations and practical experience would be gratefully received.


Cheers

James
| | - The Matronics Zenith-List Email Forum - | | | Use the List Feature Navigator to browse the many List utilities available such as the Email Subscriptions page, Archive Search & Download, 7-Day Browse, Chat, FAQ, Photoshare, and much more:
http://www.matronics.com/Navigator?Zenith-List |
|
_________________
Cell +27 83 675 0815 |
|
| Back to top |
|
|
psm(at)att.net
Guest
|
| Posted: Fri Dec 30, 2011 2:45 am Post subject: Cracked Canopy |
|
|
I didn't do any riveting on the canopy. All of the points where the
canopy gets fasteners I used screws with tinnerman washers.
Paul
Camas, WA
On 12/29/2011 10:32 PM, Scotsman wrote:
| Quote: |
How have you guys dealt with riveting on the canopy? The sides of the front and rear canopy would need to be riveted but after my past experiences cracking the canopy I am really reluctant to do anything.
Now having learnt from the thread I will use the recommended drill bit and techniques but I am still worried that the pressure generated by the rivet on the canopy will cause the canopy to crack.
Any recommendations and practical experience would be gratefully received.
Cheers
James
--------
Cell +27 83 675 0815
Read this topic online here:
http://forums.matronics.com/viewtopic.php?p=361971#361971
|
| | - The Matronics Zenith-List Email Forum - | | | Use the List Feature Navigator to browse the many List utilities available such as the Email Subscriptions page, Archive Search & Download, 7-Day Browse, Chat, FAQ, Photoshare, and much more:
http://www.matronics.com/Navigator?Zenith-List |
|
|
|
| Back to top |
|
|
Scotsman
Joined: 27 Aug 2007
Posts: 89
Location: Johannesburg, South Africa
|
| Posted: Fri Dec 30, 2011 3:01 am Post subject: Re: Cracked Canopy |
|
|
Thanks Paul, and in the places where you have to go first through an aluminum piece and then into the canopy did you just make a large size hole in both the canopy material and the aluminum skin with the washer seated over the top of the two?


J
| | - The Matronics Zenith-List Email Forum - | | | Use the List Feature Navigator to browse the many List utilities available such as the Email Subscriptions page, Archive Search & Download, 7-Day Browse, Chat, FAQ, Photoshare, and much more:
http://www.matronics.com/Navigator?Zenith-List |
|
_________________
Cell +27 83 675 0815 |
|
| Back to top |
|
|
psm(at)att.net
Guest
|
| Posted: Fri Dec 30, 2011 4:07 am Post subject: Cracked Canopy |
|
|
I hate to admit I just don't remember the answer to that question. I
looked at a photo I have on my computer and it seems like I made similar
sized holes in the aluminum and plastic and seated the tinnerman washer
on the outside of the aluminum. On the other hand, I just can't remember.
I'll take a look next time I am at the airport.
Paul
On 12/30/2011 3:01 AM, Scotsman wrote:
| Quote: |
Thanks Paul, and in the places where you have to go first through an aluminum piece and then into the canopy did you just make a large size hole in both the canopy material and the aluminum skin with the washer seated over the top of the two?
J
--------
Cell +27 83 675 0815
Read this topic online here:
http://forums.matronics.com/viewtopic.php?p=361980#361980
|
| | - The Matronics Zenith-List Email Forum - | | | Use the List Feature Navigator to browse the many List utilities available such as the Email Subscriptions page, Archive Search & Download, 7-Day Browse, Chat, FAQ, Photoshare, and much more:
http://www.matronics.com/Navigator?Zenith-List |
|
|
|
| Back to top |
|
|
Scotsman
Joined: 27 Aug 2007
Posts: 89
Location: Johannesburg, South Africa
|
|
| Back to top |
|
|
steve.freeman(at)syntaxds
Guest
|
| Posted: Fri Dec 30, 2011 7:29 am Post subject: Cracked Canopy |
|
|
<< made similar sized holes in the aluminum and plastic and seated the

tinnerman washer on the outside of the aluminum.  >>


And what did you use for a fastener in locations like this?


For instance - on the 650 B - there is a side flashing then the canopy

bubble.  If tinnerman washer is used in this location, what is used to

fasten the screw?  I was planning on riveting in these locations with my

hand riveter so I could control the force of the pull a little better.


Steve


--
| | - The Matronics Zenith-List Email Forum - | | | Use the List Feature Navigator to browse the many List utilities available such as the Email Subscriptions page, Archive Search & Download, 7-Day Browse, Chat, FAQ, Photoshare, and much more:
http://www.matronics.com/Navigator?Zenith-List |
|
|
|
| Back to top |
|
|
psm(at)att.net
Guest
|
| Posted: Fri Dec 30, 2011 8:25 am Post subject: Cracked Canopy |
|
|
No, I'm not taunting you. I just have a bad memory. I did the canopy 3
or 4 years ago.
You may not know - I had to ground my plane for a couple of years just
as it was ready for inspection. That was when the NTSB and FAA joined
forces and asked all owners to ground XLs. Then, I installed the
upgrade in the hangar at the airport. It would have been a lot easier
to do if I could use my shop but I didn't want to haul the plane back to
the shop.
I'm just nearing the end of flight test now. The plane was first flown
in July.
The good news - I have not had any problems with the canopy. That is,
the canopy has stayed in place with no cracks. I did manage to scratch
it - probably while installing the engine cowl. I bought a polishing
kit and will probably fix the scratches next Spring. They are not deep
and they are in a location I don't use to see where I am going.
You'll get there. Just keep working . . .
Paul
On 12/30/2011 7:22 AM, Scotsman wrote:
| Quote: |
Are you taunting me on purpose...."I'll take a look next time I am at the airport" [Laughing] [Laughing] I can only go as far as looking next time that I am passing through my garage! [Crying or Very sad]
--------
Cell +27 83 675 0815
Read this topic online here:
http://forums.matronics.com/viewtopic.php?p=361996#361996
|
| | - The Matronics Zenith-List Email Forum - | | | Use the List Feature Navigator to browse the many List utilities available such as the Email Subscriptions page, Archive Search & Download, 7-Day Browse, Chat, FAQ, Photoshare, and much more:
http://www.matronics.com/Navigator?Zenith-List |
|
|
|
| Back to top |
|
|
psm(at)att.net
Guest
|
| Posted: Fri Dec 30, 2011 8:30 am Post subject: Cracked Canopy |
|
|
Hi Steve,


I used the same screws and tinnerman washers at all locations where a

fastener goes through the plastic canopy.  I'm afraid riveting through

the plastic will surely cause cracks.


Again I must claim lack of clear memory of exactly what the screws

attached to.   The way the screws work they have a tinnerman washer on

the outside and a solid piece of metal (either aluminum or steel) on the

inside with the plastic canopy captured in the middle.  I think the self

tapping screws easily go into either steel or aluminum when you have a

proper sized pilot hole in the metal.


I'm not sure, but I think some of the screws go into the thin wall

square tubing that makes up the basic structure of the canopy base.


Paul


On 12/30/2011 7:27 AM, Steve Freeman wrote:

[quote]


 <<  made similar sized holes in the aluminum and plastic and seated the

 tinnerman washer on the outside of the aluminum.>>


 And what did you use for a fastener in locations like this?


 For instance - on the 650 B - there is a side flashing then the canopy

 bubble.  If tinnerman washer is used in this location, what is used to

 fasten the screw?  I was planning on riveting in these locations with my

 hand riveter so I could control the force of the pull a little better.


 Steve


 --
| | - The Matronics Zenith-List Email Forum - | | | Use the List Feature Navigator to browse the many List utilities available such as the Email Subscriptions page, Archive Search & Download, 7-Day Browse, Chat, FAQ, Photoshare, and much more:
http://www.matronics.com/Navigator?Zenith-List |
|
|
|
| Back to top |
|
|
steve.freeman(at)syntaxds
Guest
|
| Posted: Sat Dec 31, 2011 7:15 am Post subject: Cracked Canopy |
|
|
HI Paul,


I appreciate what you are saying but unless some type of rivnut is epoxied

to the inside of the canopy it would be virtually impossible to install a

screw (even loosely) in the rear canopy.  While it would not be impossible

it would be incredibly difficult (and I can't think of a way right now) to

get a tool to hold a nut while the screw were tightened.


I am thinking of lining the inside 20mm edge of the rear canopy with the

Slap Stix product Jerry Latimer recommended after pre-drilling for a rivet.

Then I will carefully pull the rivets by hand.


Anyone else have any ideas?


Steve


--
| | - The Matronics Zenith-List Email Forum - | | | Use the List Feature Navigator to browse the many List utilities available such as the Email Subscriptions page, Archive Search & Download, 7-Day Browse, Chat, FAQ, Photoshare, and much more:
http://www.matronics.com/Navigator?Zenith-List |
|
|
|
| Back to top |
|
|
psm(at)att.net
Guest
|
| Posted: Sat Dec 31, 2011 8:25 am Post subject: Cracked Canopy |
|
|
Hi Steve,


Yes, the rear end of the canopy is a different issue from the portion

that meets the metal mechanism and flashing.


In the rear, I just installed some rubber seal material.  I also trimmed

the plastic so it fits the metal curve of the rear fuselage top.  I

don't think this makes a completely perfect seal, but I don't think that

matters either.


At first I planned to stick some rubber sealing material between the

canopy and the fuselage side edges.  After seeing another XL at the Sun

n Fun auction last year I decided to try just leaving the 1/4 inch or so

open to the air.  All of this seems to work just fine.  There might be a

little air noise in flight at 120 kts, but I use noise cancelling (Bose)

headphones anyway.  I would guess the actual airflow through the canopy

seal gaps is very small - perhaps similar to the flow into the cabin

from the cabin heater and two air vents.


Paul


On 12/31/2011 7:10 AM, Steve Freeman wrote:

[quote]


 HI Paul,


 I appreciate what you are saying but unless some type of rivnut is epoxied

 to the inside of the canopy it would be virtually impossible to install a

 screw (even loosely) in the rear canopy.  While it would not be impossible

 it would be incredibly difficult (and I can't think of a way right now) to

 get a tool to hold a nut while the screw were tightened.


 I am thinking of lining the inside 20mm edge of the rear canopy with the

 Slap Stix product Jerry Latimer recommended after pre-drilling for a rivet.

 Then I will carefully pull the rivets by hand.


 Anyone else have any ideas?


 Steve


 --
| | - The Matronics Zenith-List Email Forum - | | | Use the List Feature Navigator to browse the many List utilities available such as the Email Subscriptions page, Archive Search & Download, 7-Day Browse, Chat, FAQ, Photoshare, and much more:
http://www.matronics.com/Navigator?Zenith-List |
|
|
|
| Back to top |
|
|
bryanmmartin
Joined: 10 Jan 2006
Posts: 1018
|
| Posted: Sat Dec 31, 2011 12:22 pm Post subject: Cracked Canopy |
|
|
I'm not familiar with the two-piece canopy but I would not recommend installing rivets into acrylic. I would think you would want to use a flashing strip to attach the rear canopy. Then glue the acrylic to the flashing. The flashing would be riveted to the fuselage.
3M double sided molding tape also works very well for attaching flashing to acrylic. The vinyl foam tape seals the gap and holds the pieces together. I used this tape on the front flashing on my 601XL, I've had no problem with it. I used it to attach the fog lights to the bumper of my old ford pickup and they never came loose in the 4 years I owned it.
On Dec 31, 2011, at 10:10 AM, Steve Freeman wrote:
| Quote: |
HI Paul,
I appreciate what you are saying but unless some type of rivnut is epoxied
to the inside of the canopy it would be virtually impossible to install a
screw (even loosely) in the rear canopy. While it would not be impossible
it would be incredibly difficult (and I can't think of a way right now) to
get a tool to hold a nut while the screw were tightened.
I am thinking of lining the inside 20mm edge of the rear canopy with the
Slap Stix product Jerry Latimer recommended after pre-drilling for a rivet.
Then I will carefully pull the rivets by hand.
Anyone else have any ideas?
|
--
Bryan Martin
N61BM, CH 601 XL,
RAM Subaru, Stratus re-drive.
| | - The Matronics Zenith-List Email Forum - | | | Use the List Feature Navigator to browse the many List utilities available such as the Email Subscriptions page, Archive Search & Download, 7-Day Browse, Chat, FAQ, Photoshare, and much more:
http://www.matronics.com/Navigator?Zenith-List |
|
_________________
--
Bryan Martin
N61BM, CH 601 XL, Stratus Subaru.
do not archive. |
|
| Back to top |
|
|
Thruster87
Joined: 16 Apr 2008
Posts: 193
Location: Australia
|
| Posted: Sat Dec 31, 2011 1:00 pm Post subject: Re: Cracked Canopy |
|
|
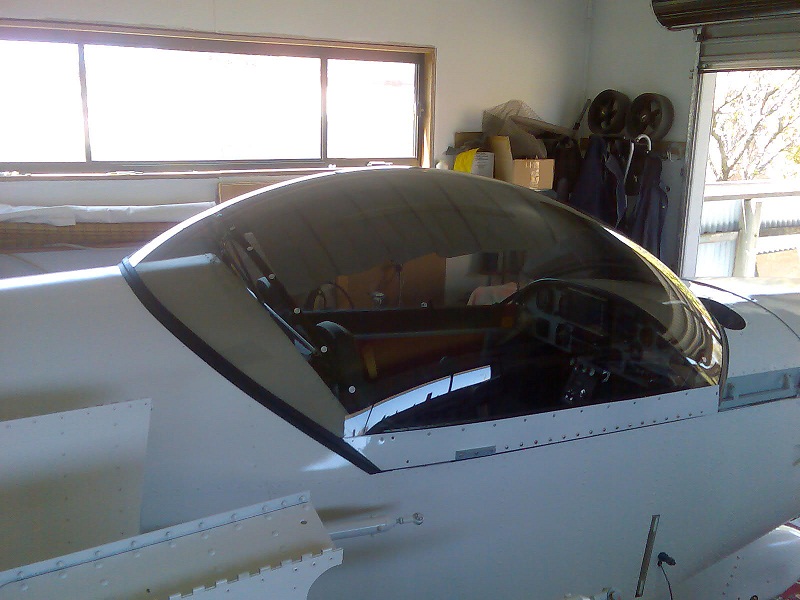
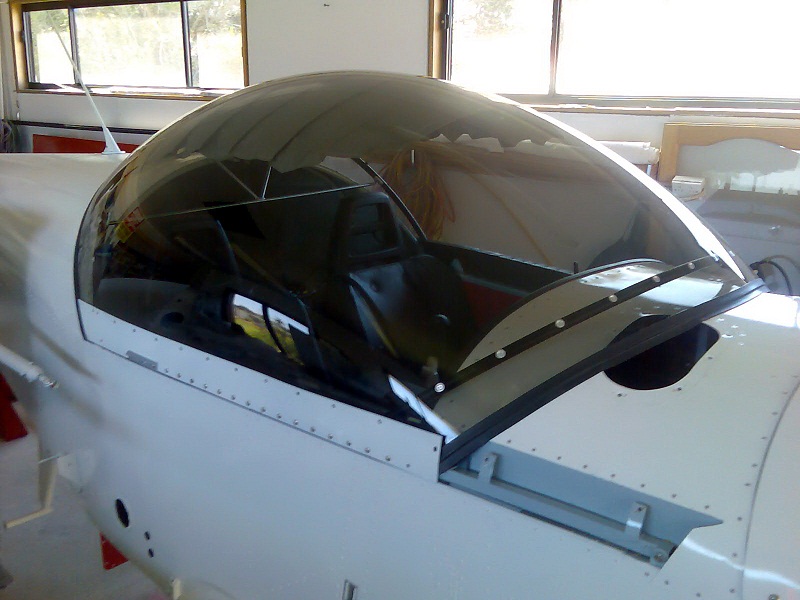
I ended up using large headed [1/2 long x 1/8Dia] self taping screws on the bottom steel RHS tubes.On the hinge cover panel I put in anchor nuts .I also cut the sides of the canopy less, so that they extend past the fuselage [by 1/8"] for weather proofing,and a very soft rubber seal under the steel RHS tubes so that the canopy locks down with only a little downward pressure.I also drilled a 3/8" hole on each side [on the inside] so you can see the locking mechanism [spring tang] engage properly and positively [put a bit of red paint on the tangs]. All holes drilled either 1/4" or bigger thru the plastic canopy [Todds canopy]using a step drill with NO cracking so far. Cheers Alan
| | - The Matronics Zenith-List Email Forum - | | | Use the List Feature Navigator to browse the many List utilities available such as the Email Subscriptions page, Archive Search & Download, 7-Day Browse, Chat, FAQ, Photoshare, and much more:
http://www.matronics.com/Navigator?Zenith-List |
|
Last edited by Thruster87 on Sat Dec 31, 2011 8:56 pm; edited 1 time in total |
|
| Back to top |
|
|
Thruster87
Joined: 16 Apr 2008
Posts: 193
Location: Australia
|
| Posted: Sat Dec 31, 2011 8:52 pm Post subject: Re: Cracked Canopy |
|
|
| Thruster87 wrote: | | I ended up using large headed [1/2 long x 1/8Dia] self taping screws on the bottom steel RHS tubes.On the hinge cover panel I put in anchor nuts .I also cut the sides of the canopy less, so that they extend past the fuselage [by 1/8"] for weather proofing,and a very soft rubber seal under the steel RHS tubes so that the canopy locks down with only a little downward pressure.I also drilled a 3/8" hole on each side [on the inside] so you can see the locking mechanism [spring tang] engage properly and positively [put a bit of red paint on the tangs]. All holes drilled either 1/4" or bigger thru the plastic canopy [Todds canopy]using a step drill with NO cracking so far. Cheers Alan |
| | - The Matronics Zenith-List Email Forum - | | | Use the List Feature Navigator to browse the many List utilities available such as the Email Subscriptions page, Archive Search & Download, 7-Day Browse, Chat, FAQ, Photoshare, and much more:
http://www.matronics.com/Navigator?Zenith-List |
|
| Description: |
|
| Filesize: |
132.24 KB |
| Viewed: |
15915 Time(s) |
|
| Description: |
|
| Filesize: |
126.67 KB |
| Viewed: |
15915 Time(s) |
|
|
|
| Back to top |
|
|
|
|
You cannot post new topics in this forum
You cannot reply to topics in this forum
You cannot edit your posts in this forum
You cannot delete your posts in this forum
You cannot vote in polls in this forum
You cannot attach files in this forum
You can download files in this forum
|
Powered by phpBB © 2001, 2005 phpBB Group
|

